

Table of Contents
6. Using directly on your Apple TV (HD or 4K Only)
7. Using your Android phone, tablet or box
10. Windows Hot-Spot Method (Windows 10)
12. Renewing your subscription
1. Overview of ChannelHopper
ChannelHopper allows you to watch UK and AUS TV channels, sites and apps anywhere in the world. These can be viewed directly on a number of different devices including your computer browsers, Apple TV, Amazon Fire TV, Tablets and Phones, Xbox, PS4 and supported Smart TVs. Please note that we are providing access to the official UK sites and apps that are in no way affiliated to ChannelHopper TV. In addition to the sites that need additional paid subscriptions (e.g Disney+), the official TV sites require you to register separately with them as you would if you was in your home country. You can use any of your email addresses in any location to do this and once logged in it should remember you so you only need do this once. If prompted for a postcode simply type in one from where you used to live, it is just for regional programmes such as the news.
Important: If you have a VPN on your computer or device, please disable it when using our service. Also note that although our service doesn’t buffer, there can be local connectivity issues that can cause buffering. In this case please power off and on your router and it should resolve.
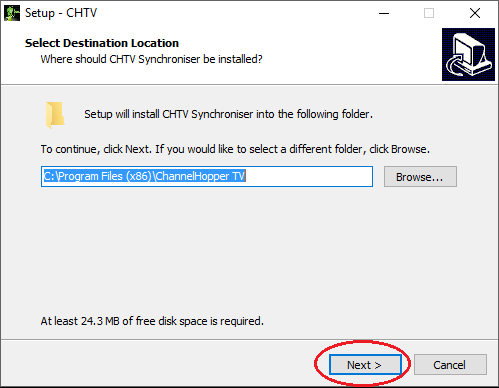
2. Using your PC
Step 1:
Click HERE and download and run installer. If you get a Windows User Account Control pop-up, click Yes to proceed.
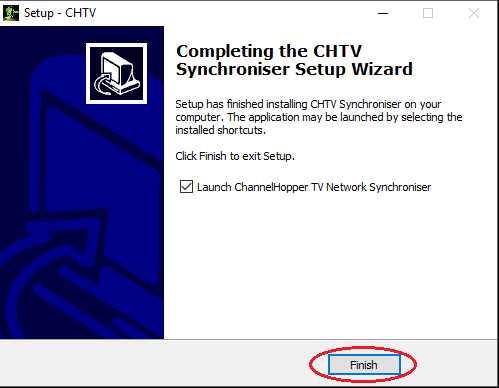
Step 2:
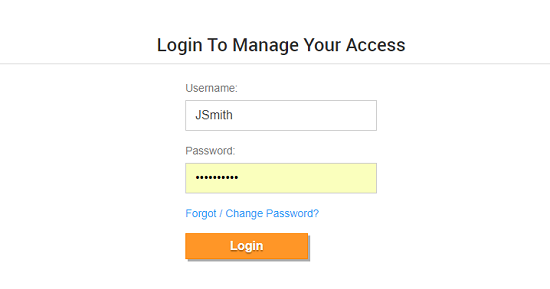
Login using your credentials sent to you in your welcome email.
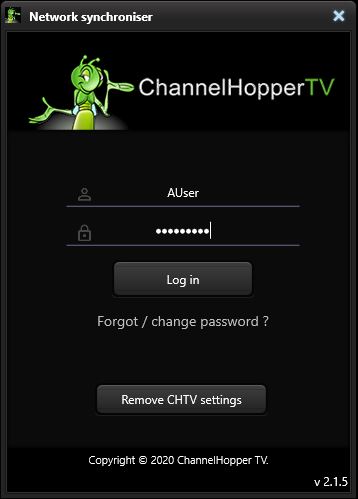
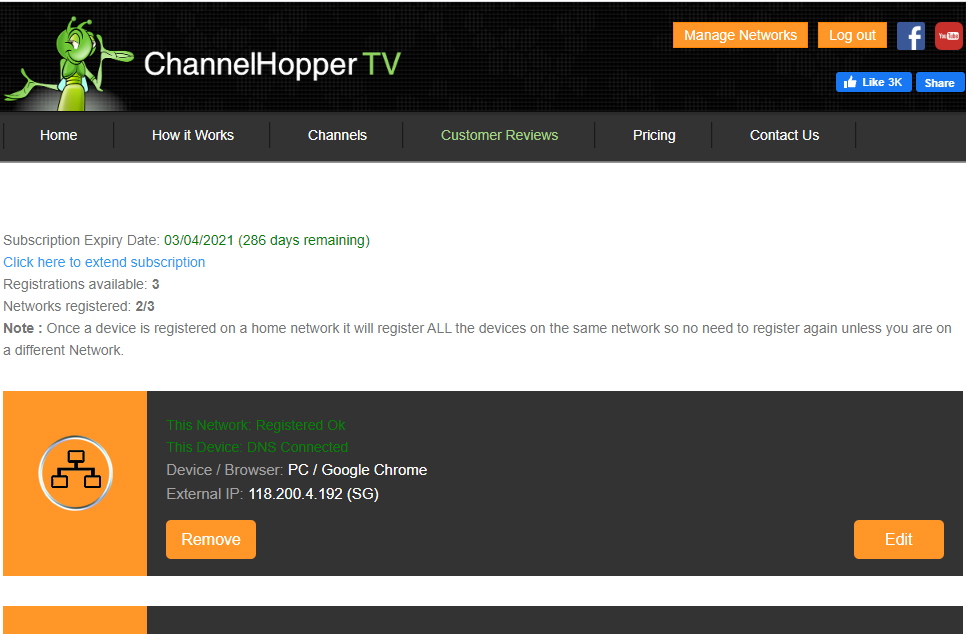
The app will now automatically configure your DNS and register your network for all your devices.
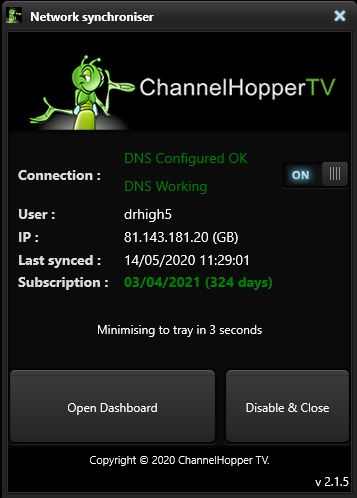
Step 3:
Now your network is registered, open your browser and go to a TV site such as BBC iPlayer (UK) or iView (AUS). You can also go directly to the other TV sites using your registered browser. Note that the official TV sites require you to register and login with them separately, this is nothing to do with your Channelhopper login so use your own email and password of choice to do so. Also note that although our service doesn’t buffer, there can be local connectivity issues that can cause buffering. In this case please power off and on your router and it should resolve.
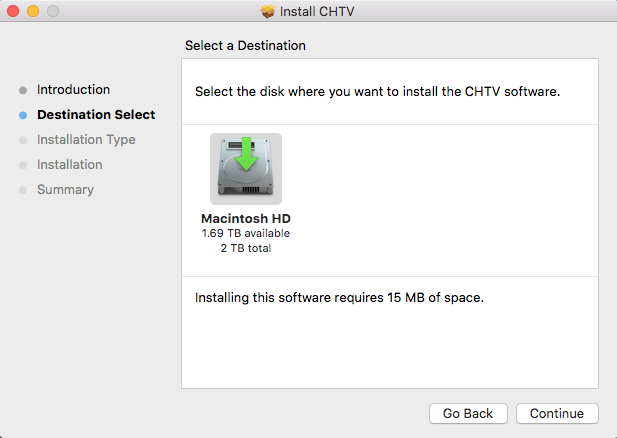
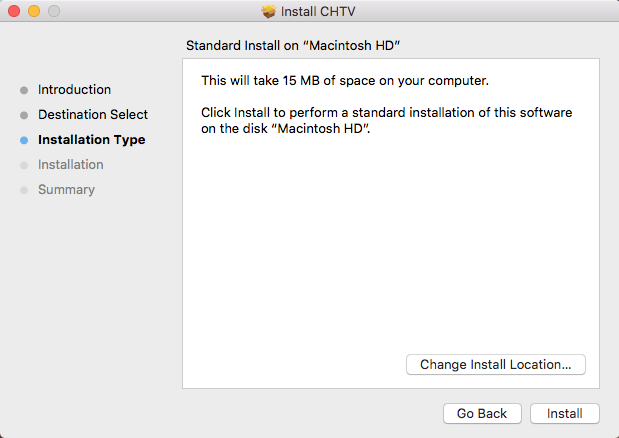
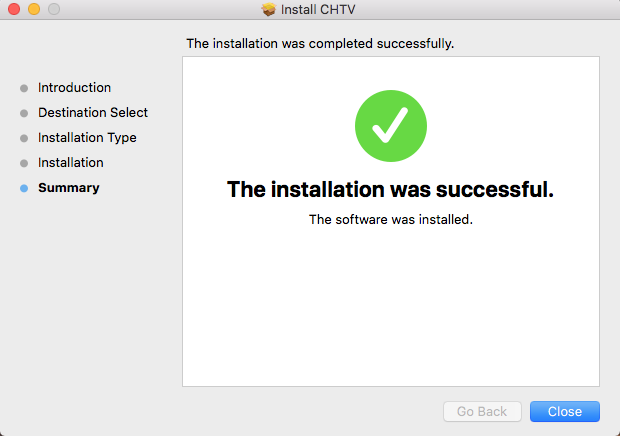
3. Using your Mac
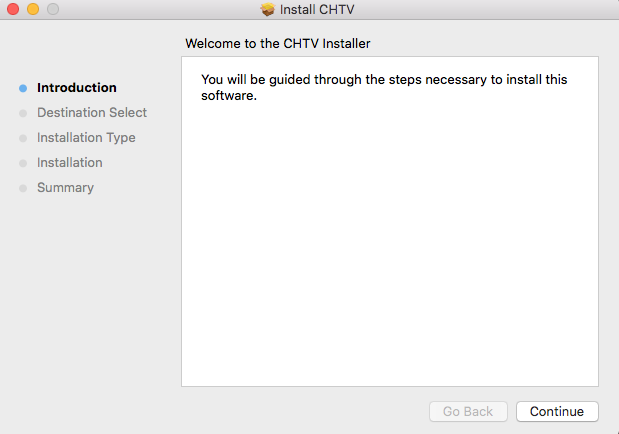
Step 1:
Click HERE and download and run installer Pkg.
Step 2:
Login using your credentials sent to you in your welcome email.
The app will now automatically configure your DNS and register your network for all your devices.
Step 3:
Now your network is registered, open your browser and go to a UK TV site such as BBC iPlayer (UK) or iView (AUS). You can also go directly to the other TV sites using your registered browser. Note that the catch-up TV sites require you to register and login with them separately, this is nothing to do with your Channelhopper login so use your own email and password of choice to do so. Also note that although our service doesn’t buffer, there can be local connectivity issues that can cause buffering. In this case please power off and on your router and it should resolve.
4. Using your Amazon Fire TV (Stick or Box)
Important: Before following the steps below please register your network on a PC, Mac or iOS device on the same home network, this will also register your Fire TV.
To do this follow the relevant guide on this page or alternatively you can now install the Firefox app on the Fire TV and register your Fire TV directly here: https://channelhopper.tv/login
You will also need to add all the TV apps of your choice to your Fire TV. To do this, on any browser login to your UK or AUS Amazon account and add the required TV apps such as BBC iPlayer (UK), ITV Hub (UK), iView (AUS), SBS (AUS) etc. See HERE. If the apps are not available for your country, check Amazon account settings and change your location to UK or AUS accordingly. If you face any issues please email us and we will assist you further.
Note that these instructions are for all models except the oldest Gen 1 versions of the Fire TV. If you have this model device then please setup using the old instructions HERE.
Step 1:
Using a browser on a device of your choice, login to your UK or AUS Amazon account and in the search box type “Downloader App”
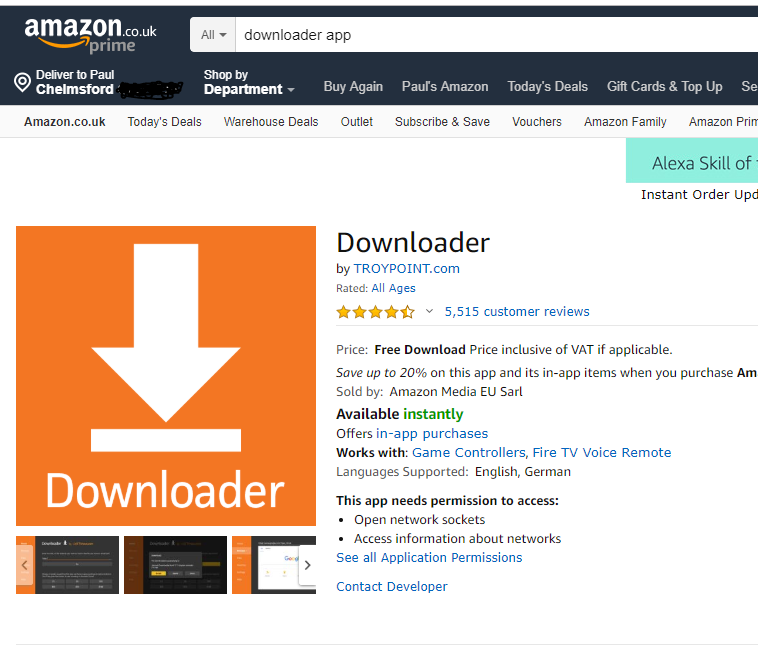
Step 2:
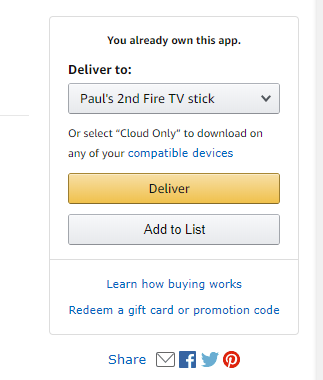
On the right hand side under “Deliver to:” select your Fire TV device and click “Deliver”.
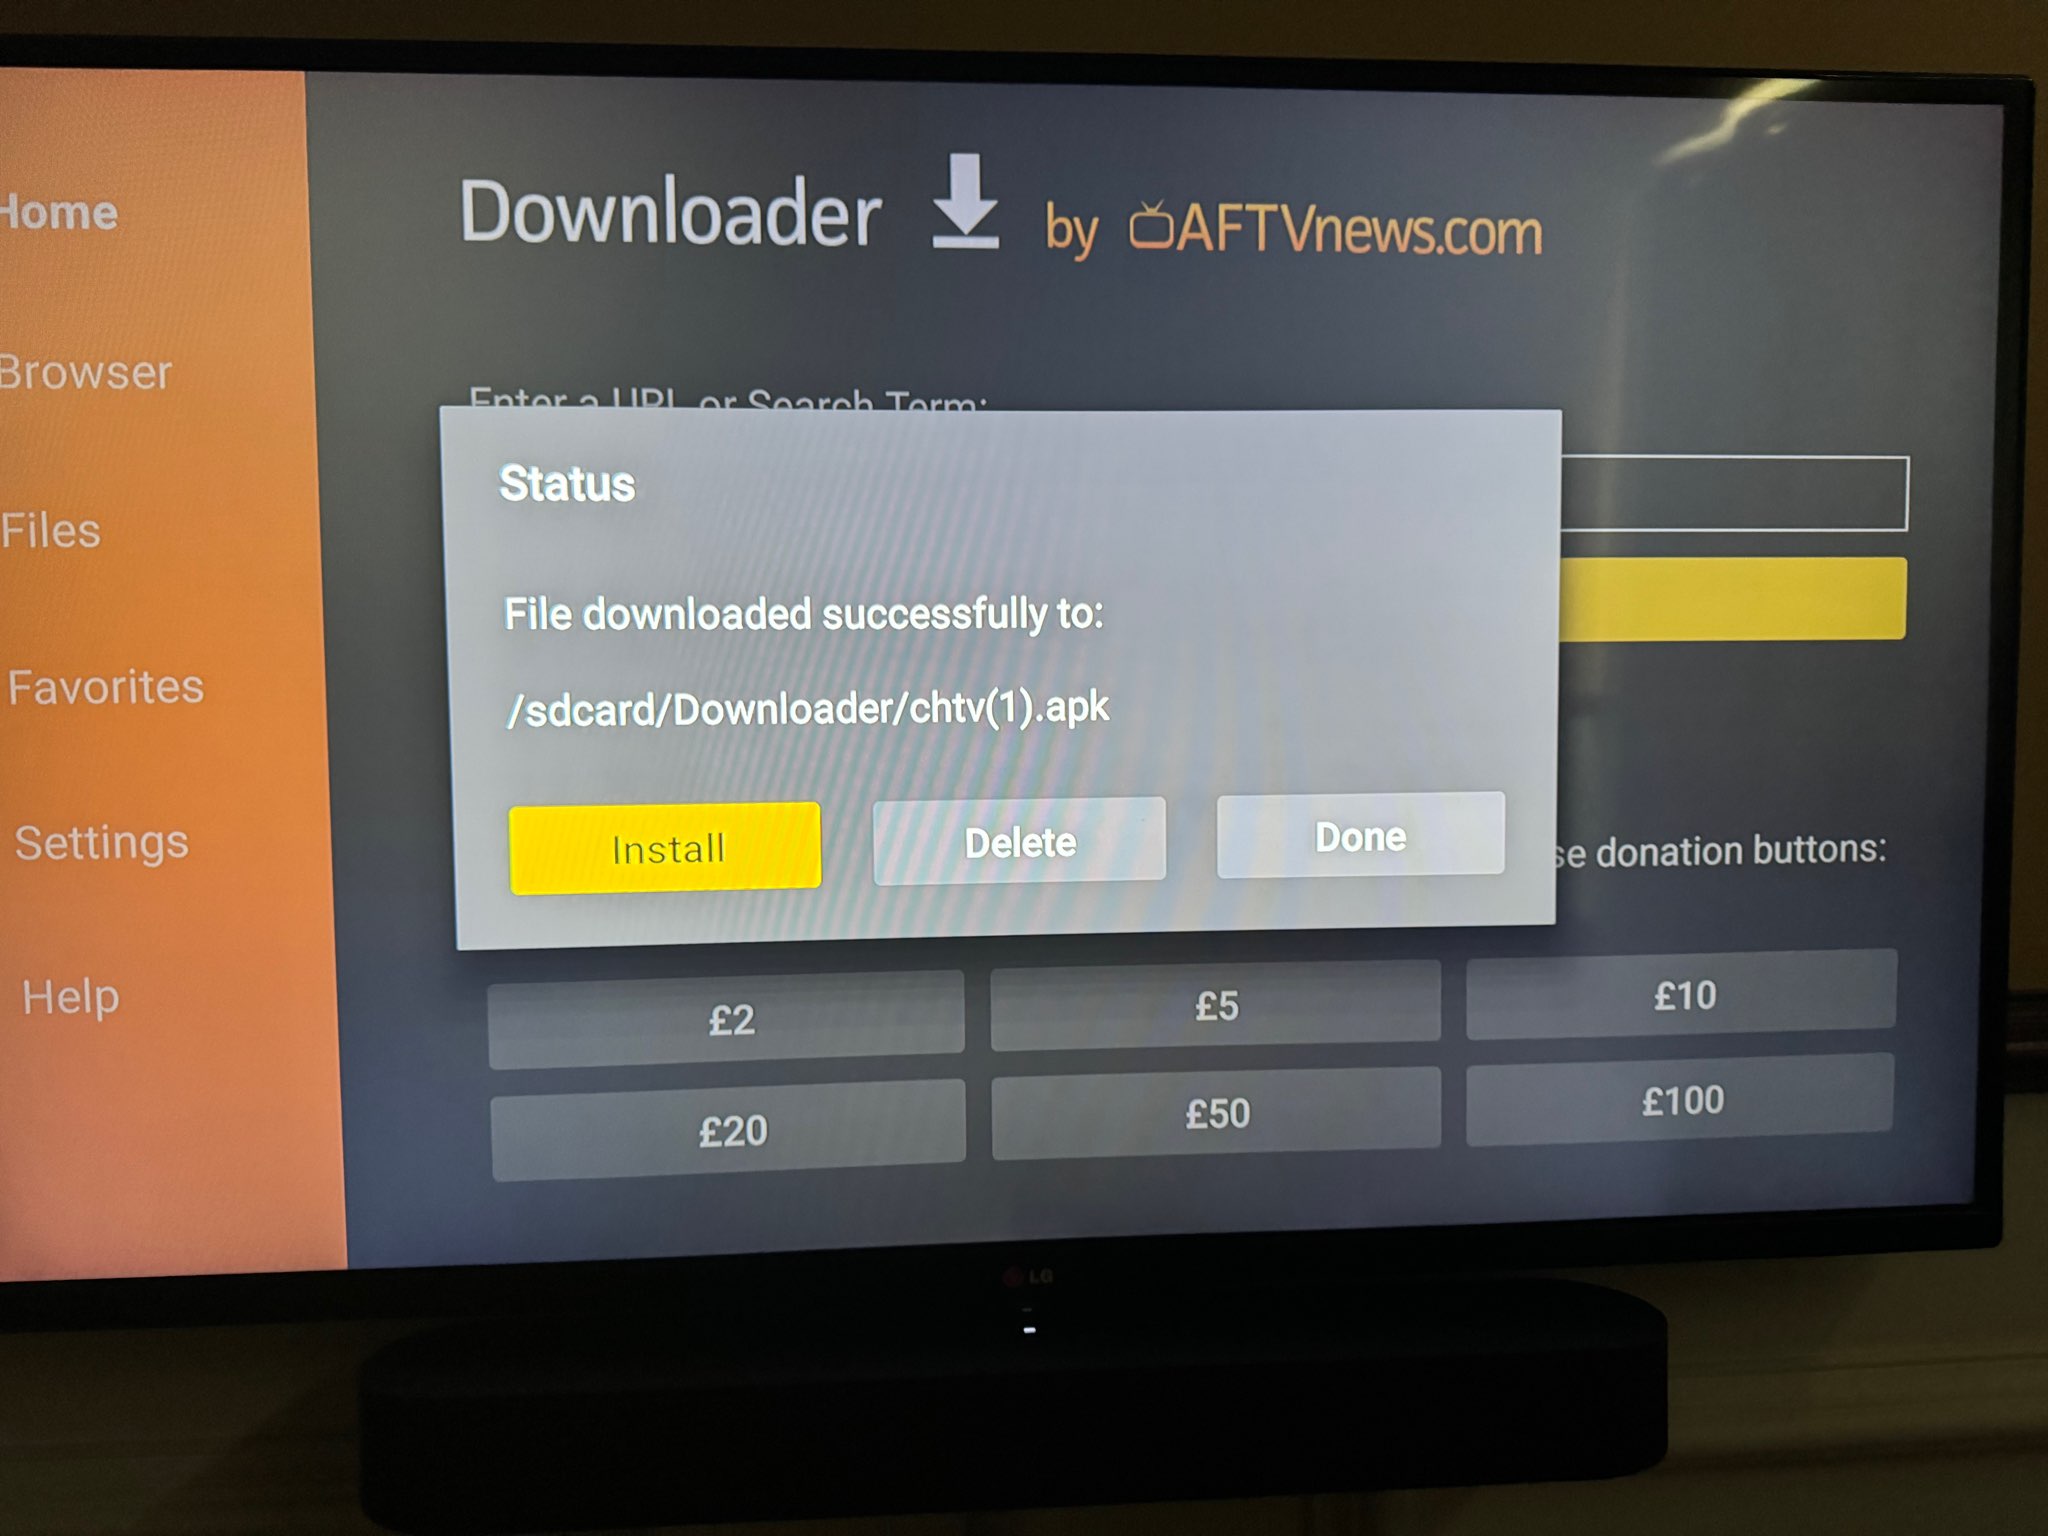
Step 3:
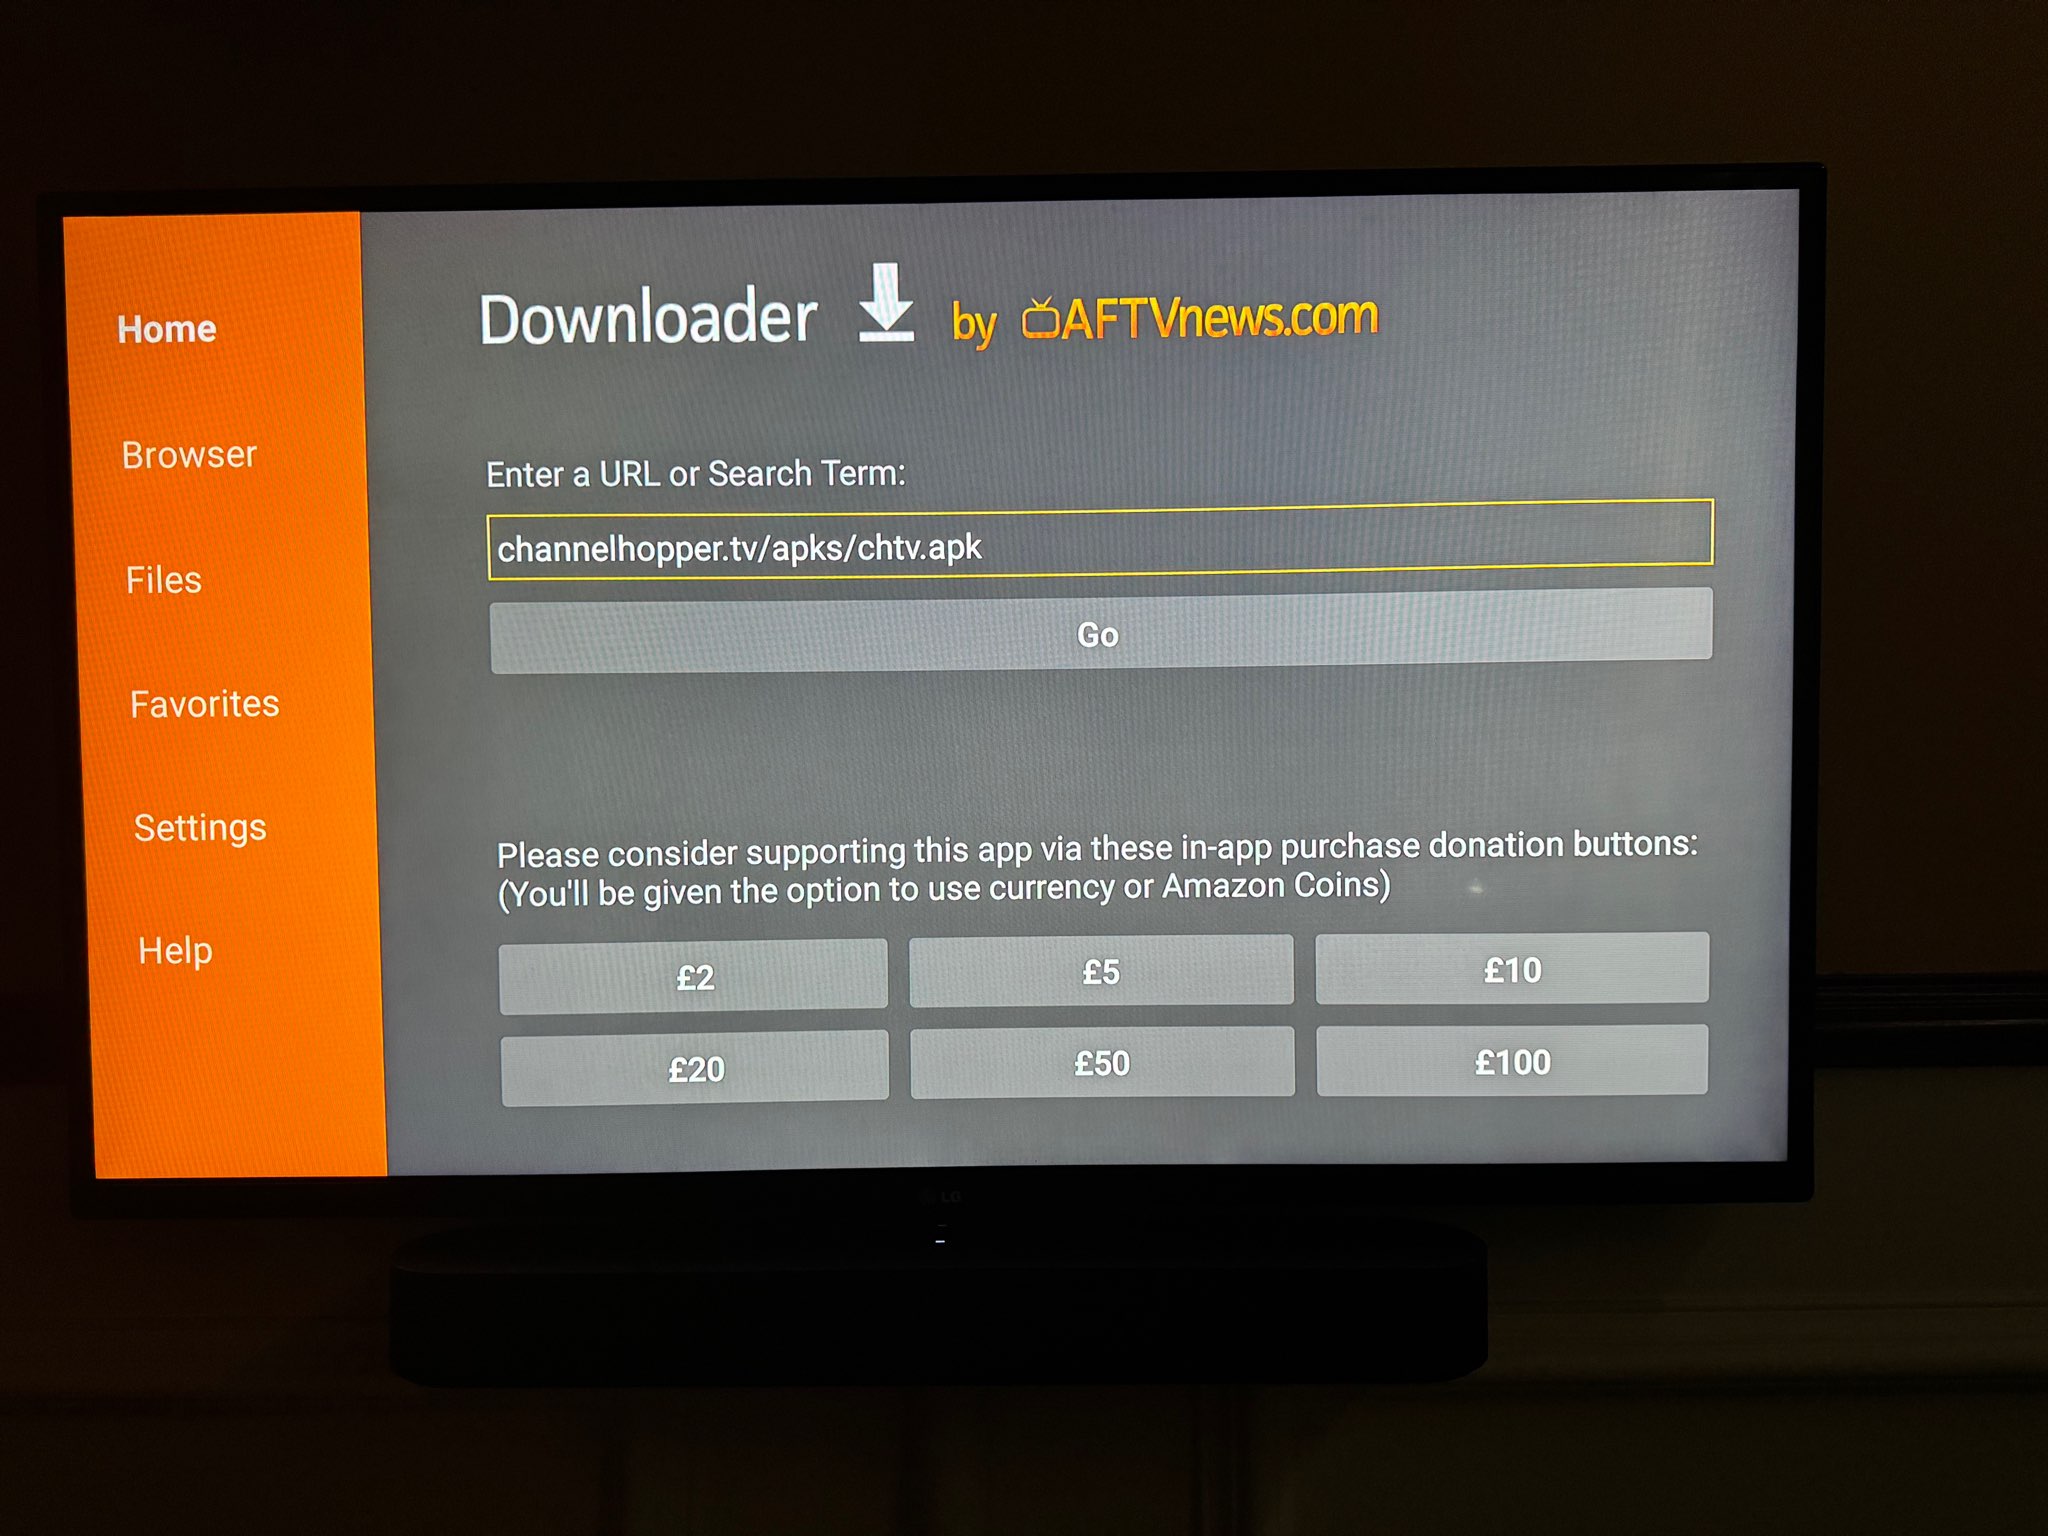
Now on your Fire TV open the Downloader App and type: channelhopper.tv/apks/chtv.apk then click “Go”.
Step 4:
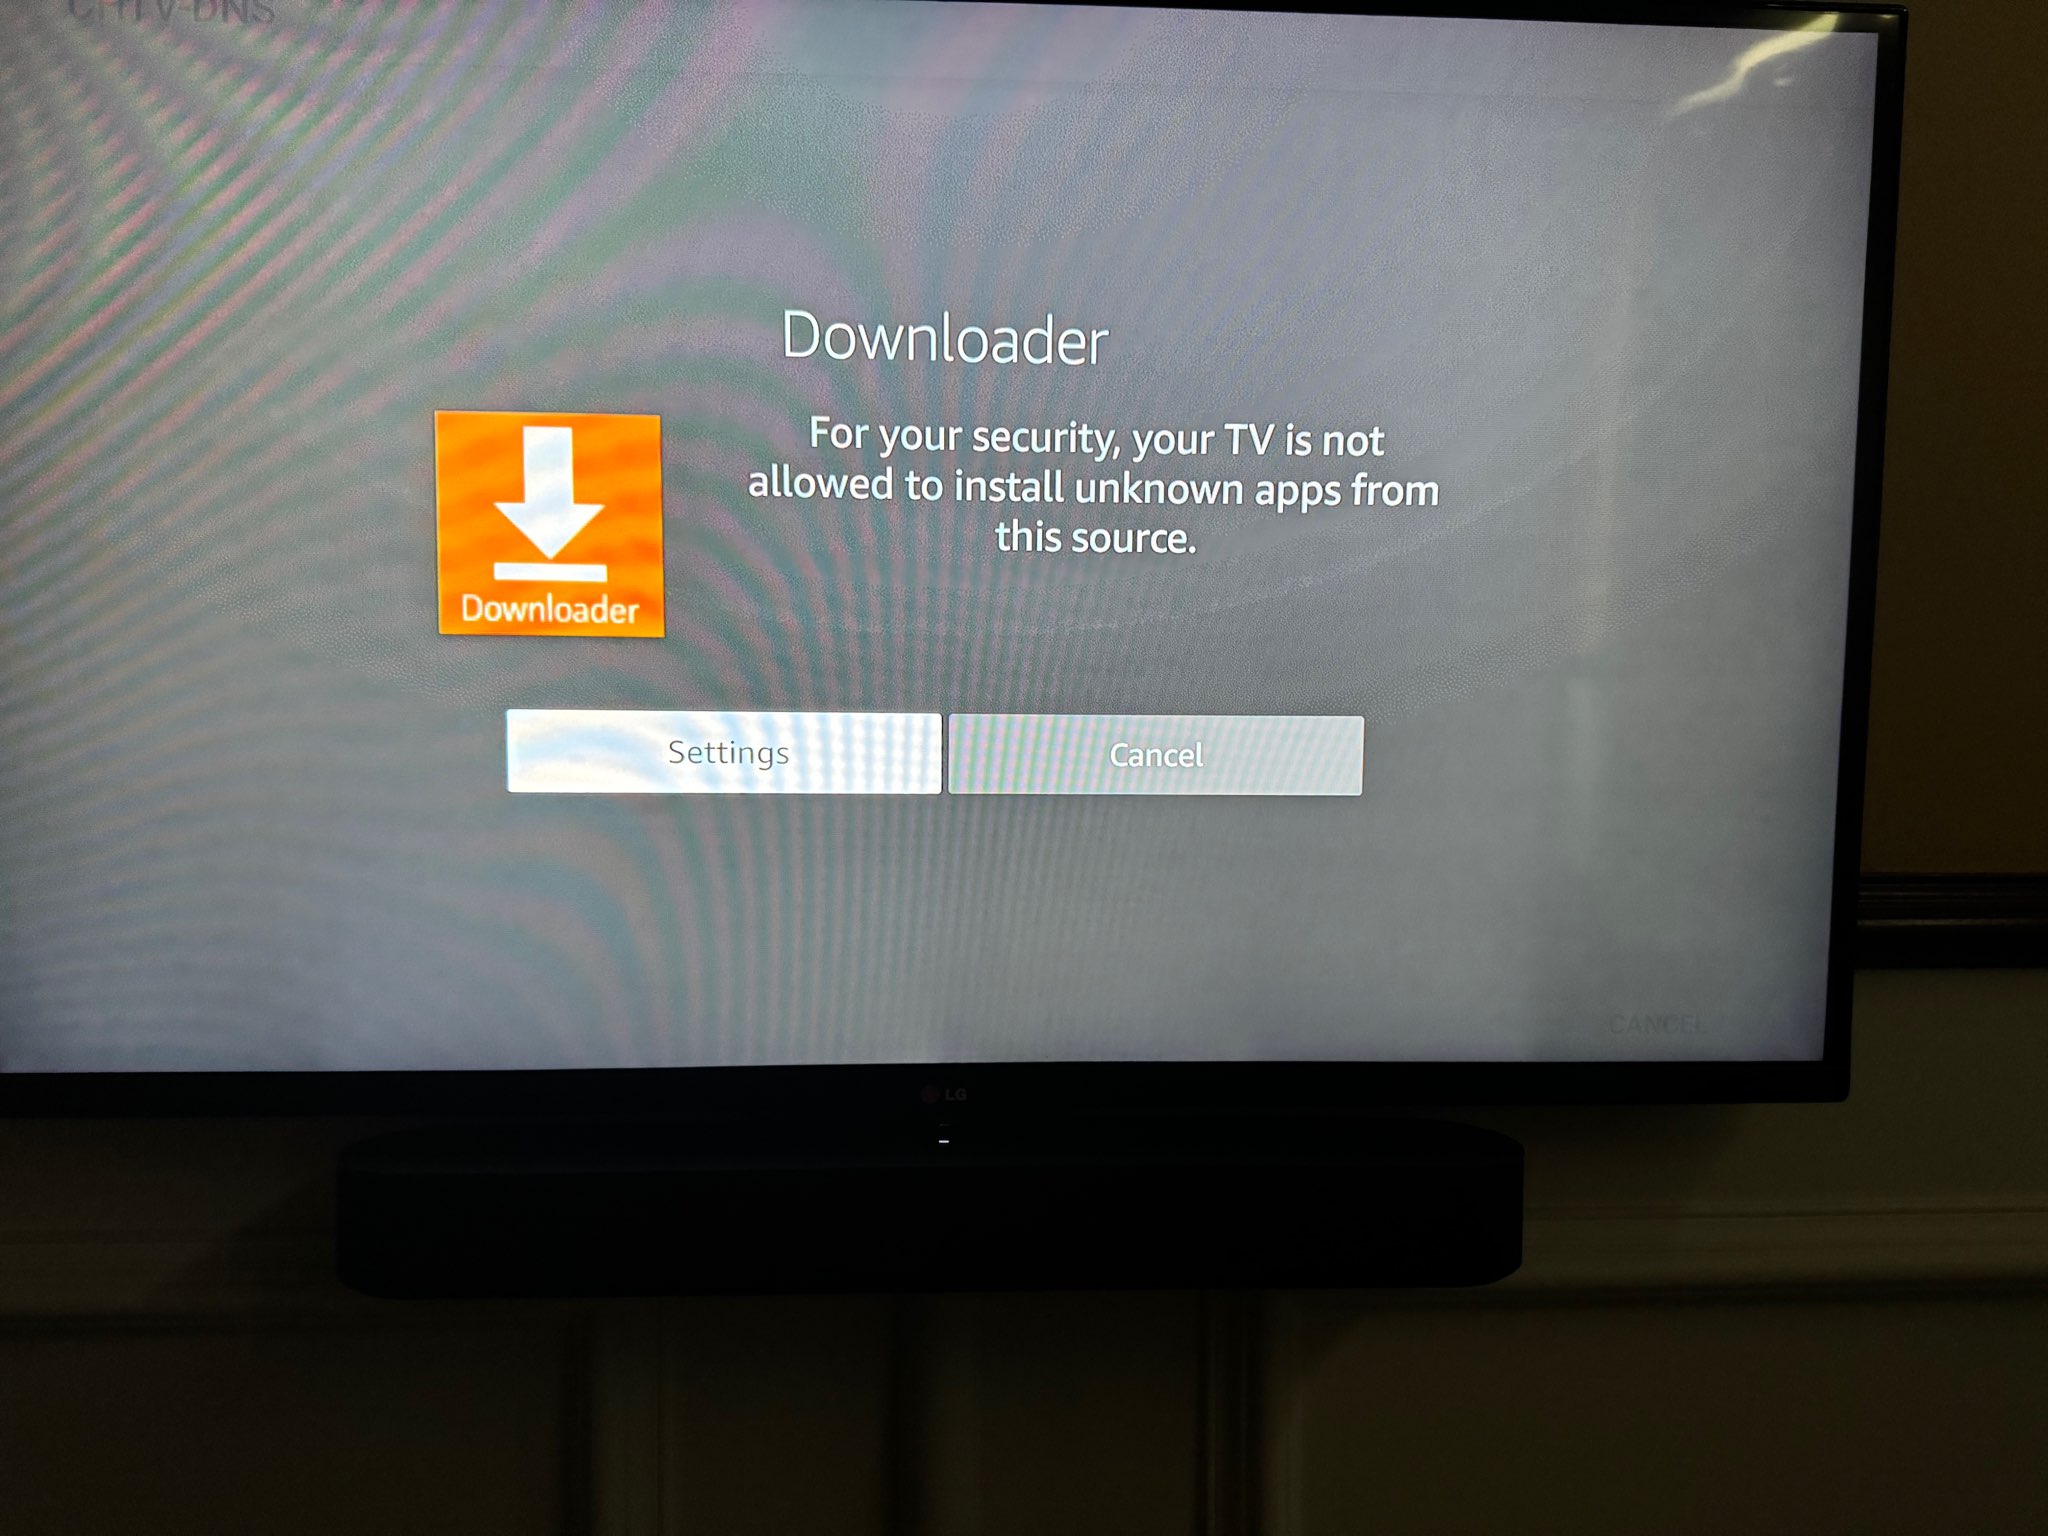
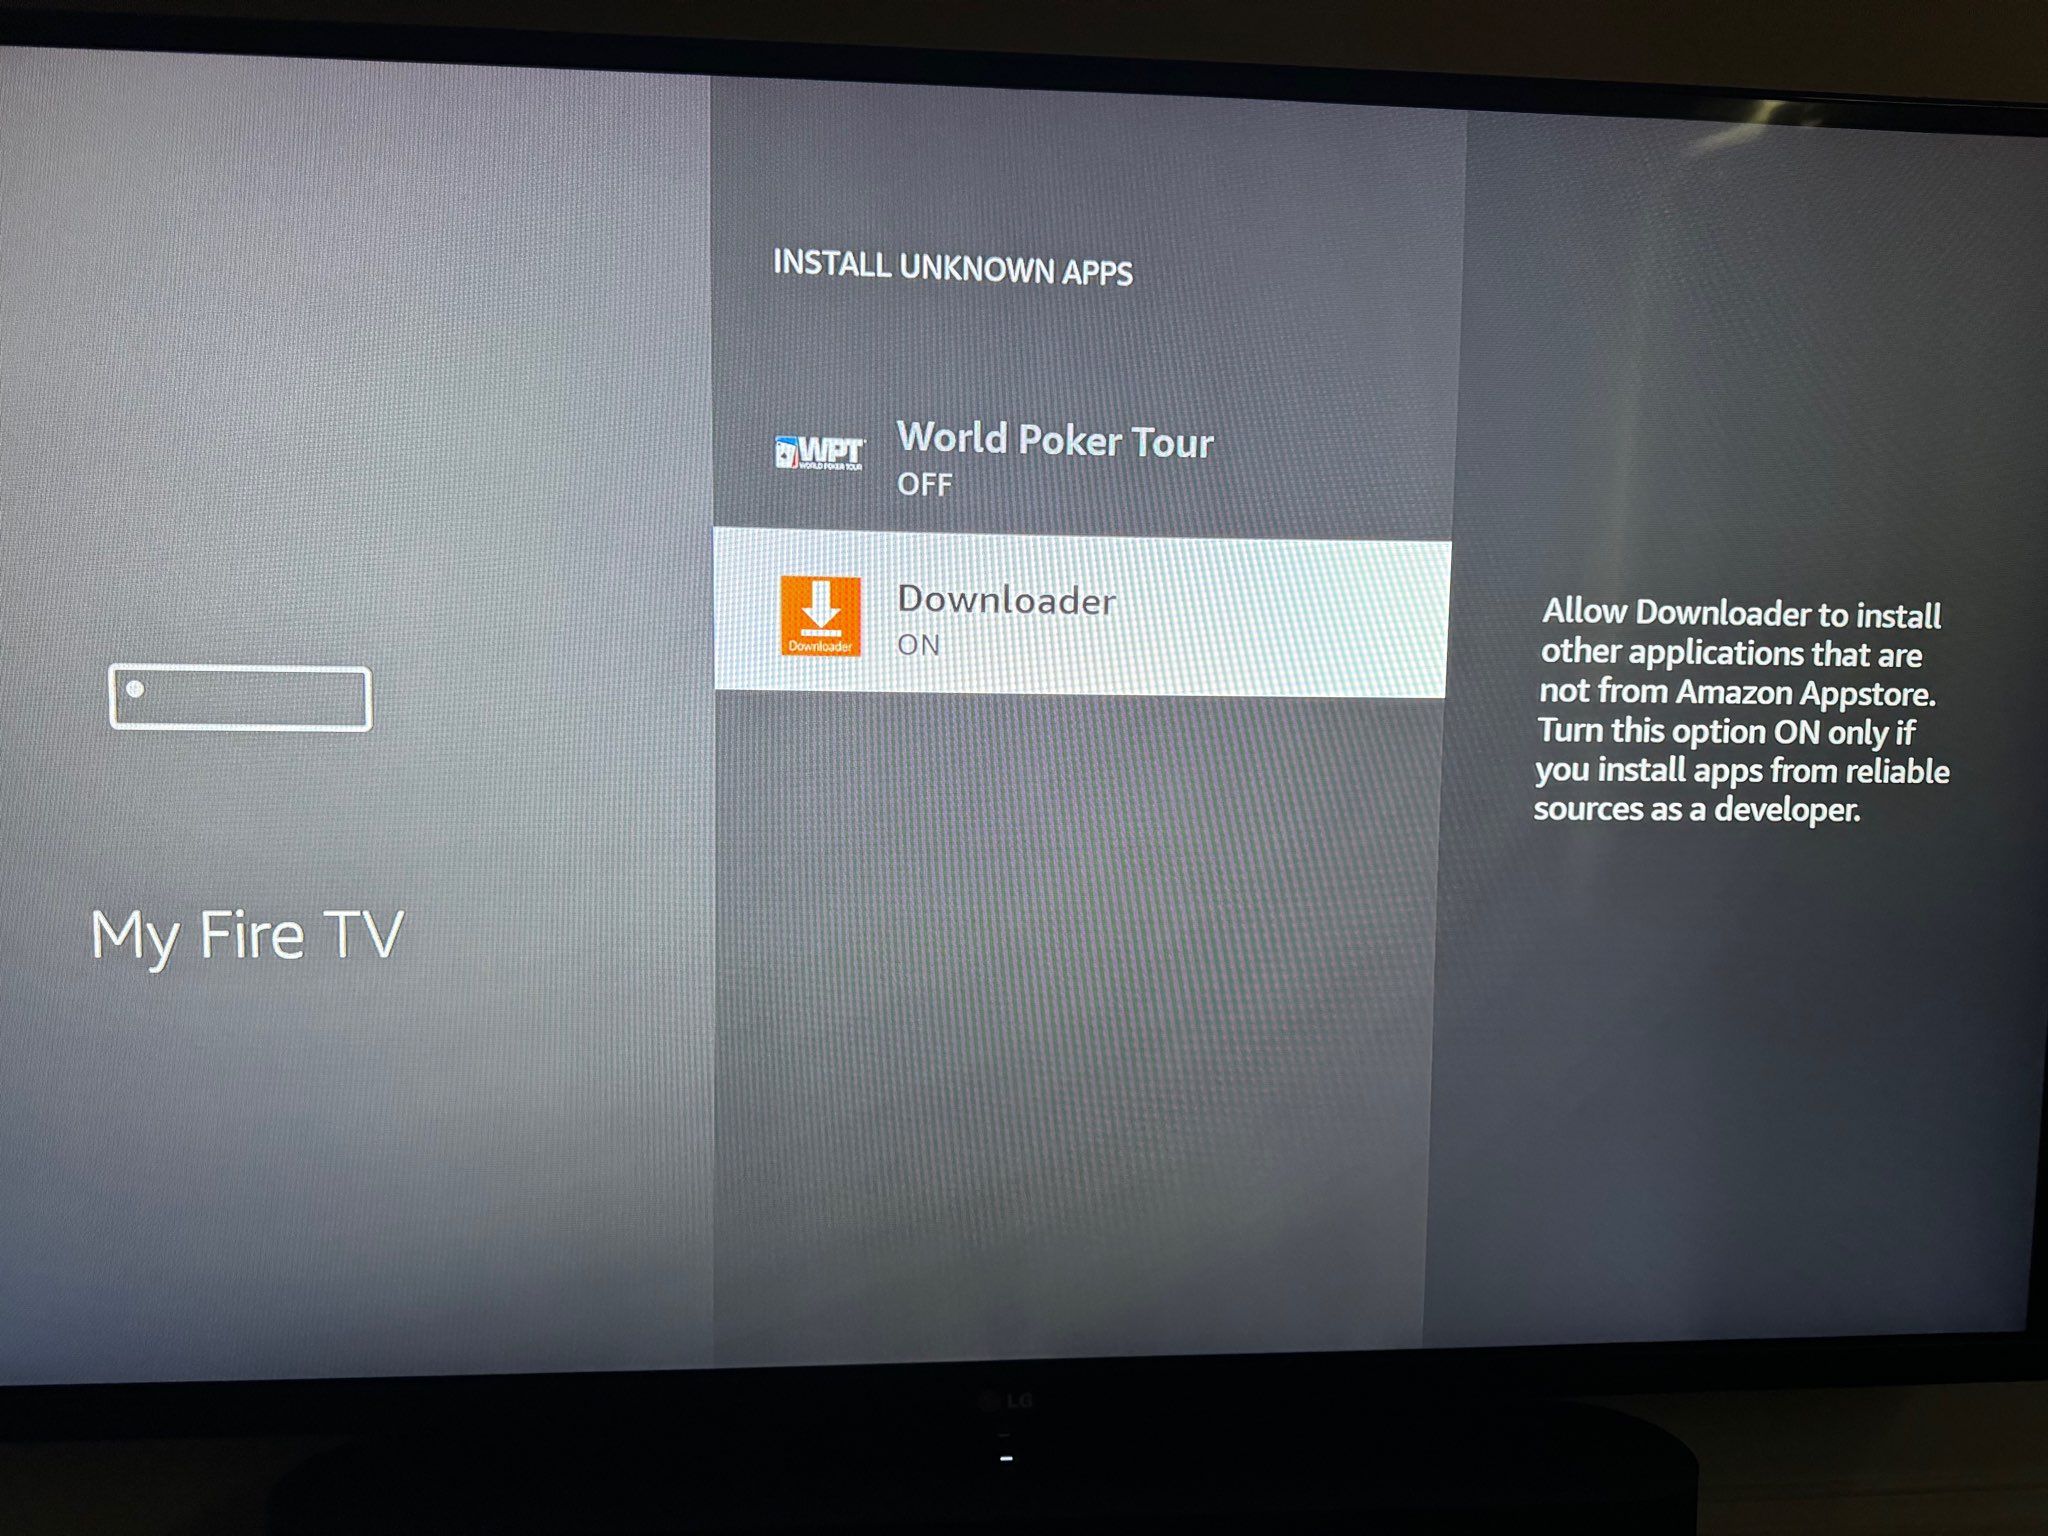
You may need to change your settings to allow unknown apps. If so select “Settings.” If not skip to Step 6.
Note: If this screen doesn’t appear you may need to enable developer option using the method HERE.
Step 5:
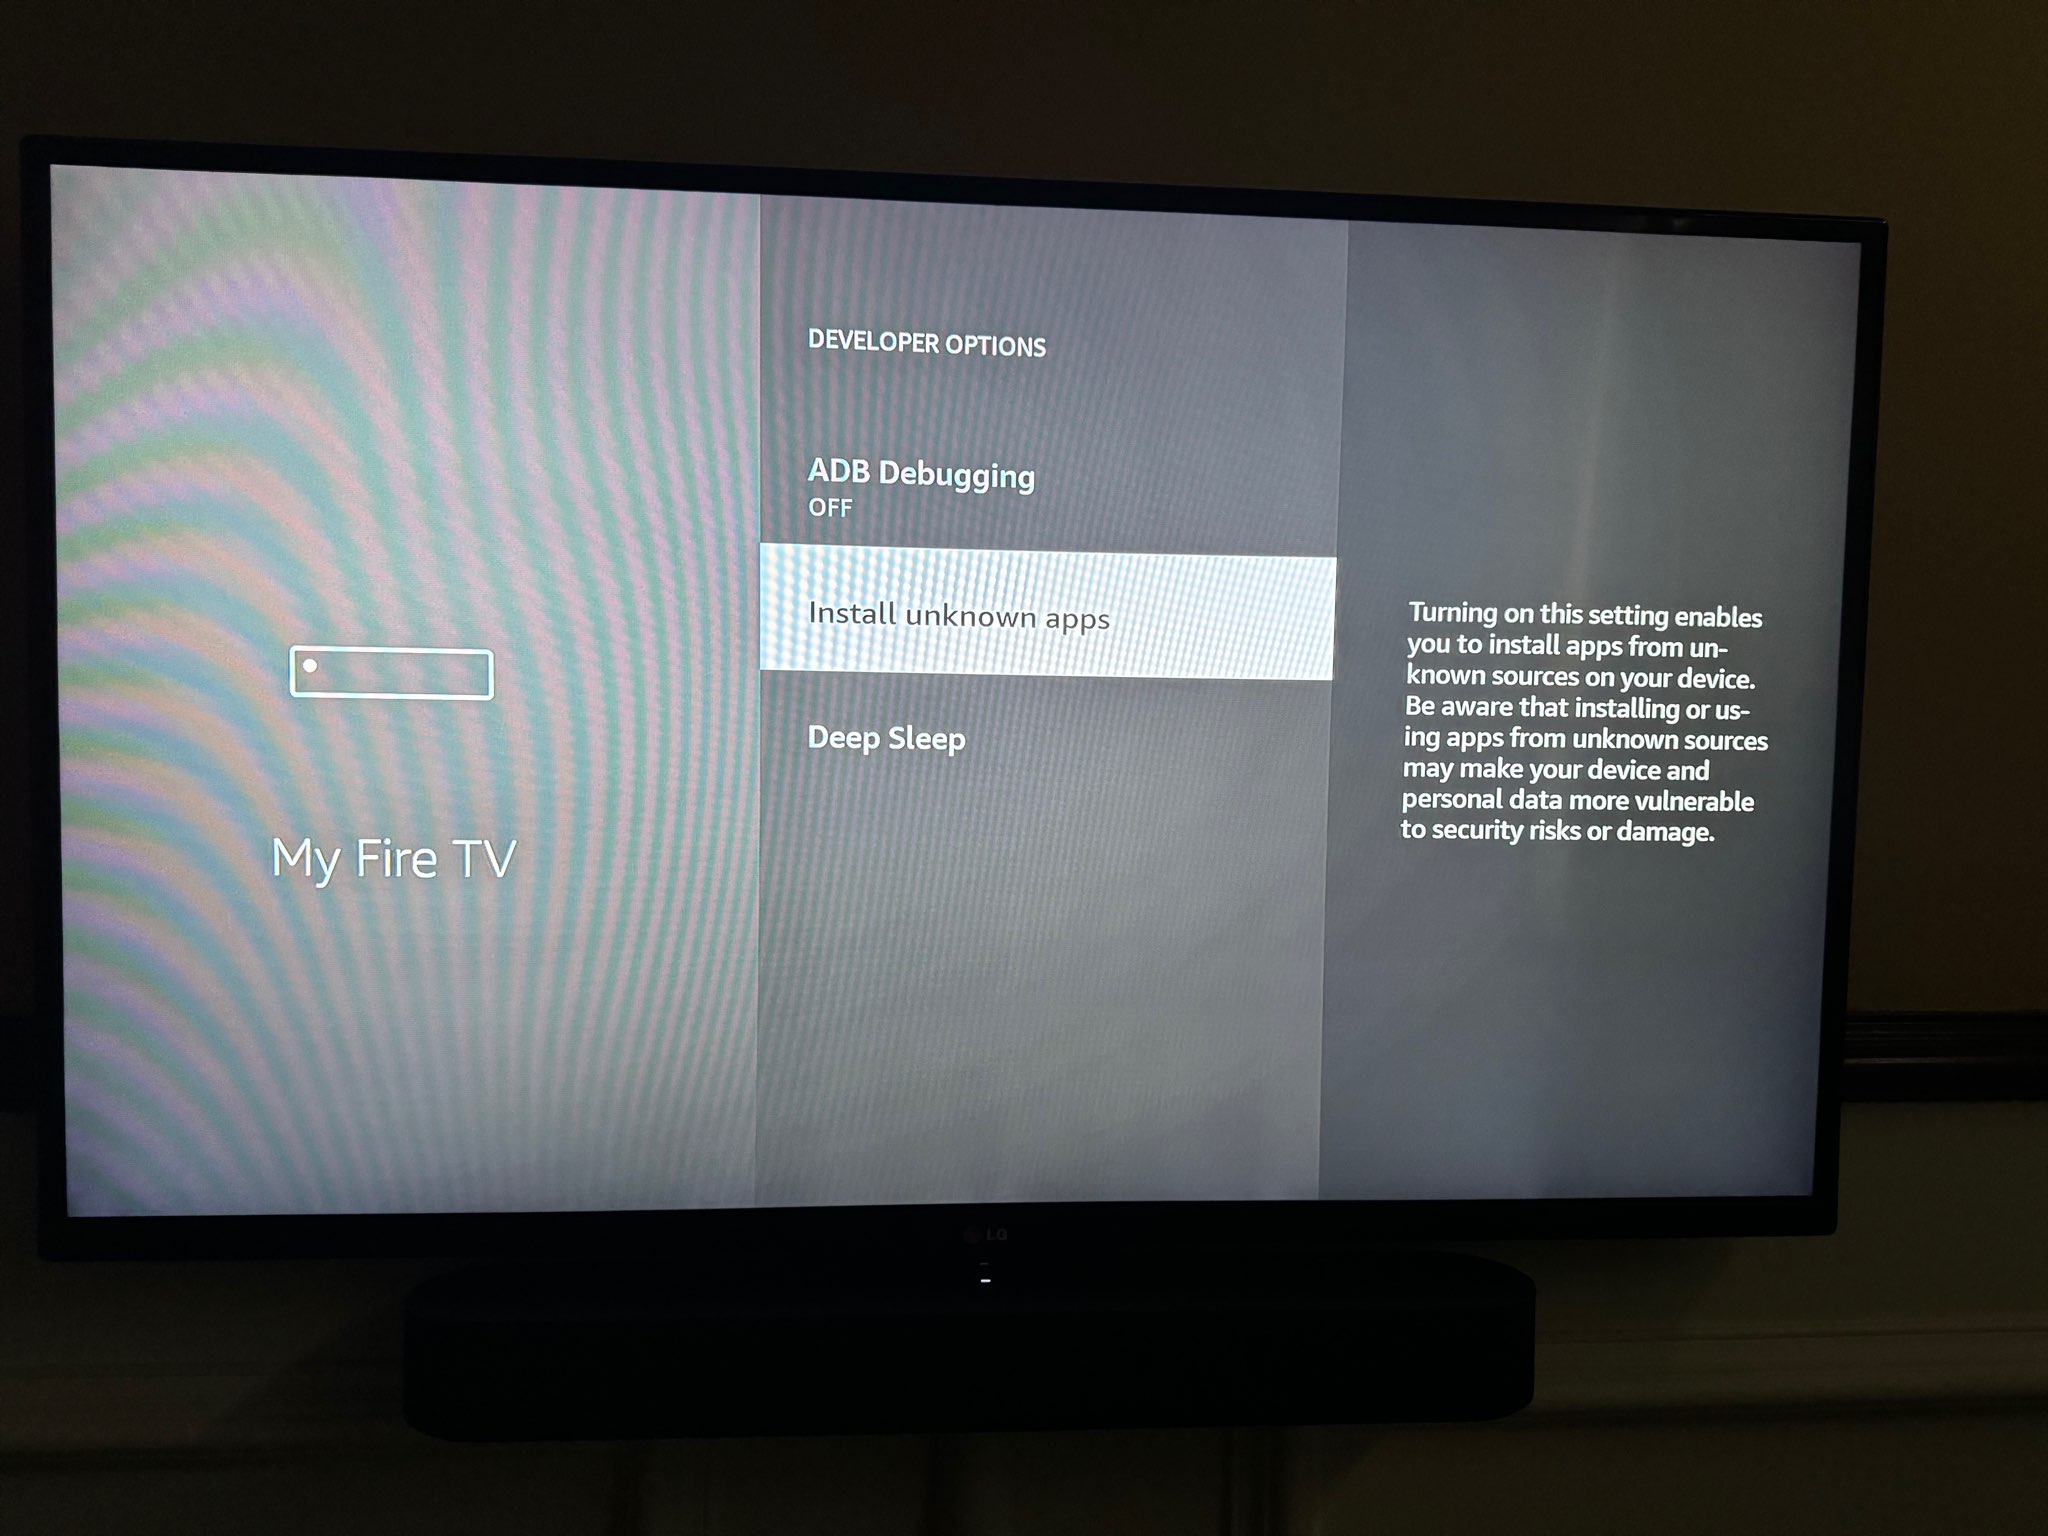
Select “Install unknown apps”.
Step 6:
Select the Downloader app and toggle it On. Then click the back button to go back to the installer.
Step 7:
Now continue to install the CHTV-DNS app.
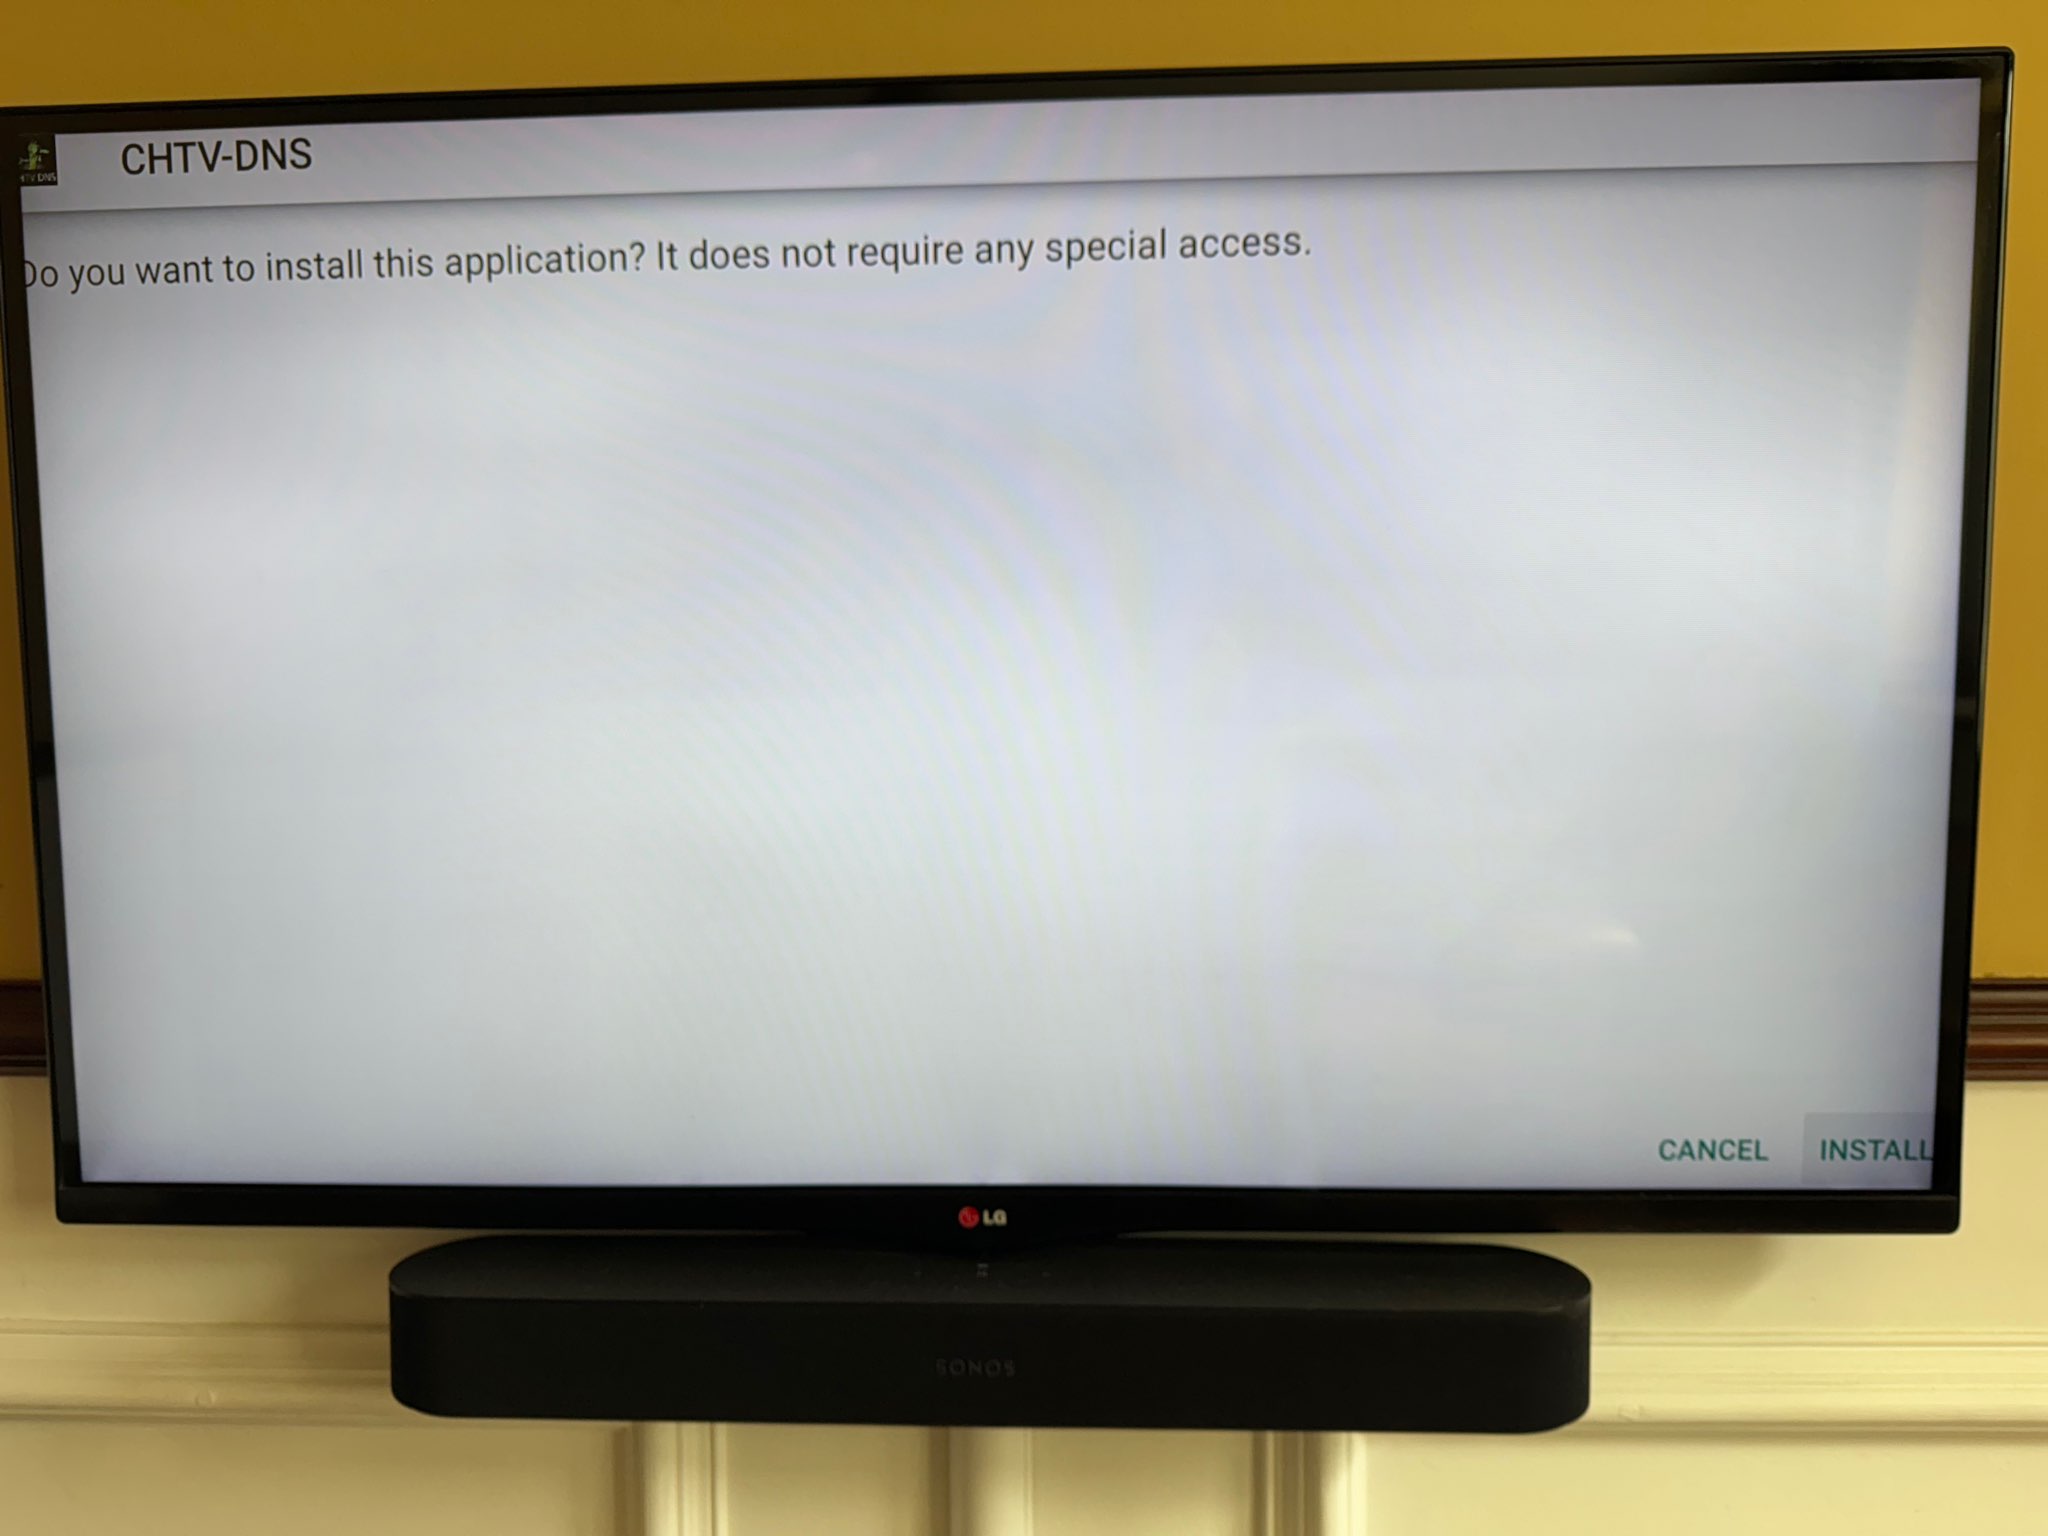
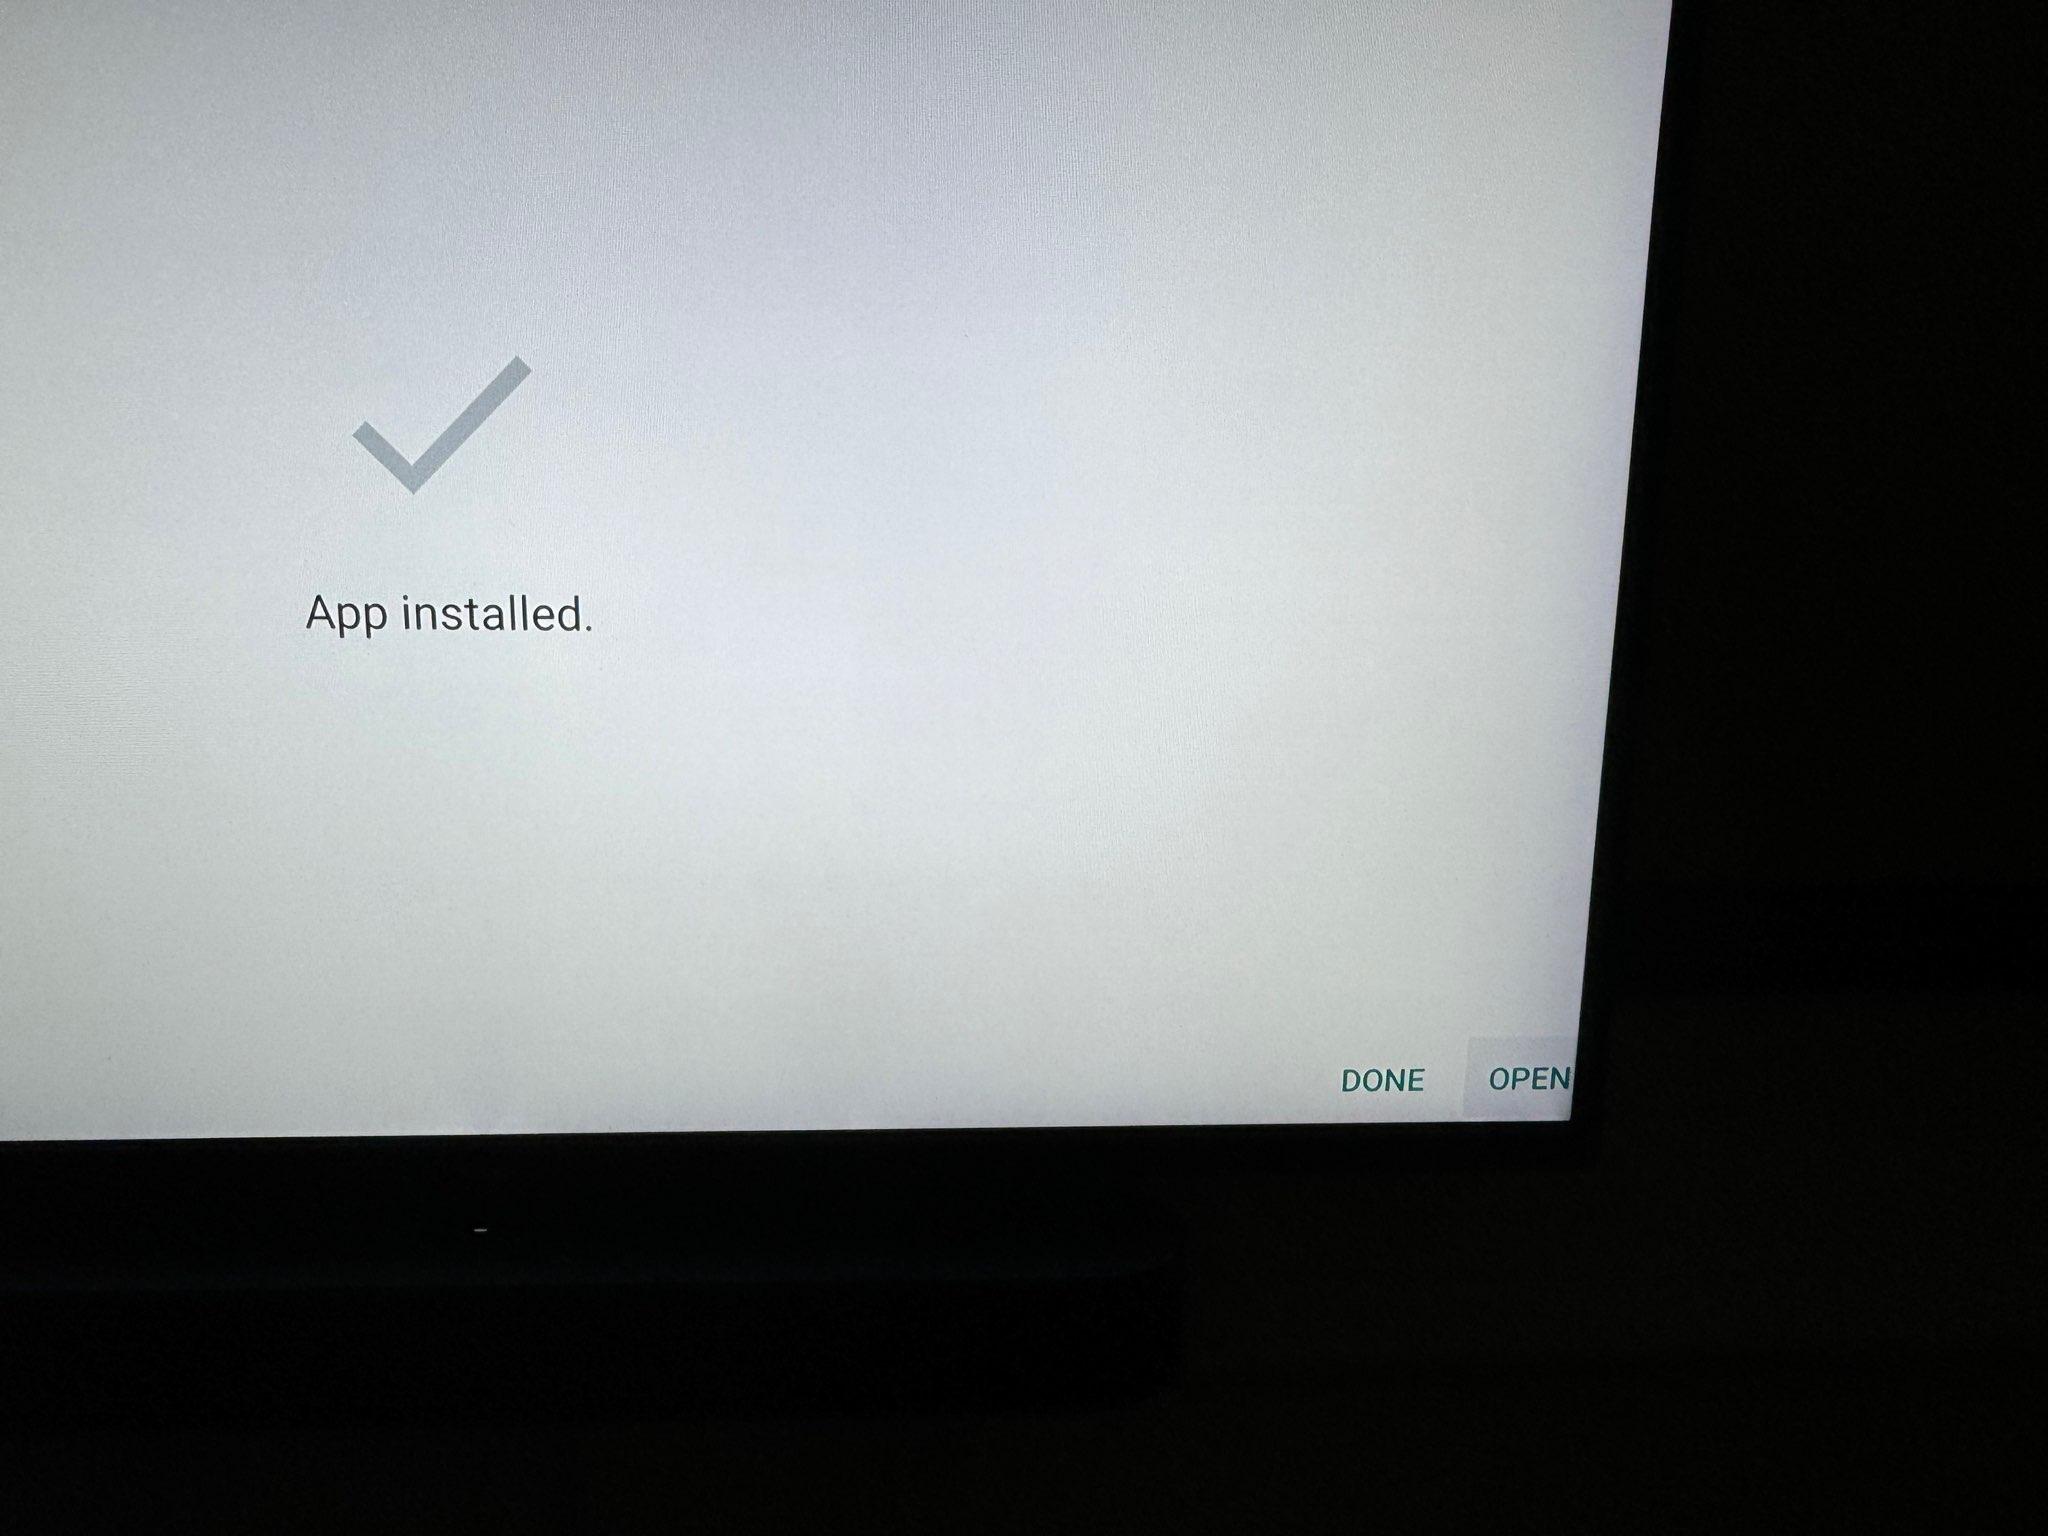
Step 8:
The App should now run, just clickClick “Connect”.
Step 9:
You may see a default android connection prompt, if so Click “OK”.
Step 10:
The App should now show you as Connected. Now click minimise or the home button on your Fire TV to return to your home screen.
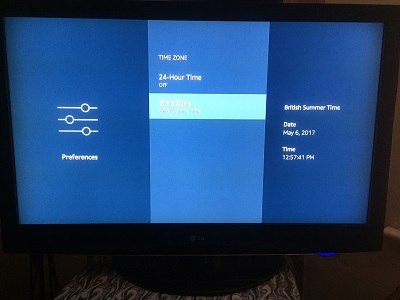
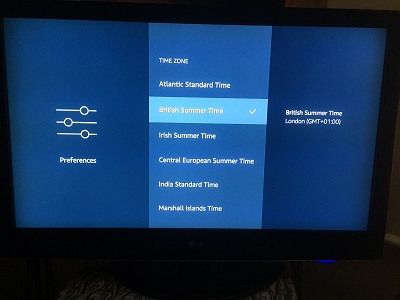
Step 11 (UK only):
Go back to “Settings” menu and select “Preferences”. Then select “Time Zone”.

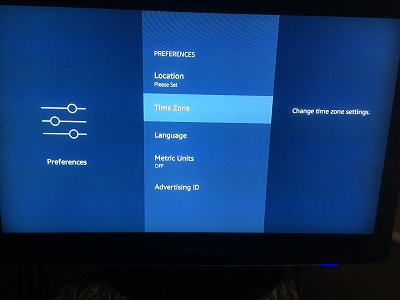
Select “Europe” then “UTC”, “GMT” or “BST” (whichever is available)”.
Step 12:
That’s it, you’re done. You can now watch all your UK / AUS TV apps abroad. As explained above, make sure your network is registered using a PC, Mac or iOS device, this will register this device also. Note that although our service doesn’t buffer, there can be local connectivity issues that can cause buffering. In this case please power off and on your router and it should resolve.
5. Using your iPad or iPhone
Important: To watch catch-up on an iOS device it is preferable to install the official TV apps from a UK or AUS Apple Store account.
e.g. BBC iPlayer (UK), iView (AUS). If you cannot find them it means you are not using a UK or AUS Apple Store account. If you don’t have one then perhaps you can switch to a family or friend’s, download the apps and then switch back. Some of the apps will work directly through the browser without the need for the apps and UK live channels (in one place) can be watched on a browser at TVPlayer.com.
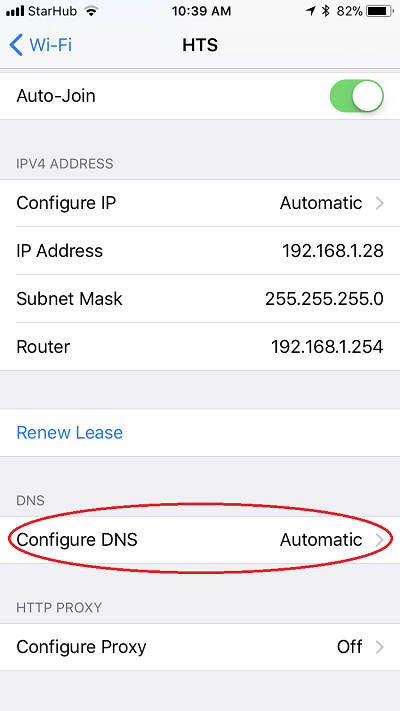
Step 1:
On an iPad or iPhone select ‘Settings’ and then ‘Wi-Fi’.
Then click on the blue i on your connected Wi-Fi access point.
Note that “HTS” is just an example and will NOT be the name of your access point SSID.
This will expand connection settings.

Step 2:
Select “Configure DNS Settings”
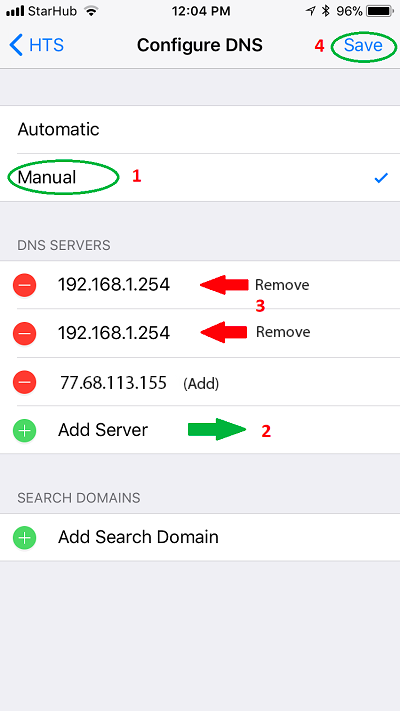
Step 3:
Select “Manual” and then “Add Server”. Type in 77.68.113.155. Then delete the old existing DNS and click Save. You can now exit the settings by pressing the home button on your device.
Step 4:
Open your browser and go to https://channelhopper.tv/login. Enter your credentials provided in your welcome email.
Step 5:
Click on “Register network”. This will register your home network for ALL devices. Now any device connected to this network with the DNS 77.68.113.155 configured will work with our service.
Step 6:
Now your network is registered, you can now watch all your UK TV apps abroad. Note that the catch-up TV sites require you to register and login with them separately, this is nothing to do with your Channelhopper login so use your own email and password of choice to do so. Also note that although our service doesn’t buffer, there can be local connectivity issues that can cause buffering. In this case please power off and on your router and it should resolve.
6. Using directly on your Apple TV (HD or 4K Models Only)
Important: Before following the steps below please register your network on a PC, Mac or iOS device on the same home network, this will also register your Apple TV. To do this follow the relevant guide on this page. To watch you will need to install the official TV apps directly on the Apple TV from a UK or AUS Apple Store account. e.g. BBC iPlayer (UK), iView (AUS). If they are not available it means you are not using a UK or AUS Apple Store account. Log out and login using the appropriate account.
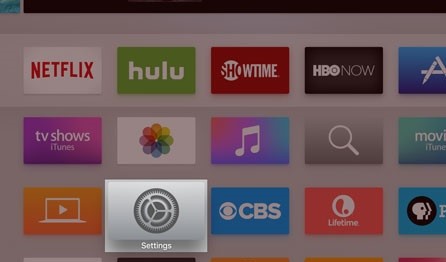
Step 1:
On Apple TV main Menu, click “Settings” then “Network”.
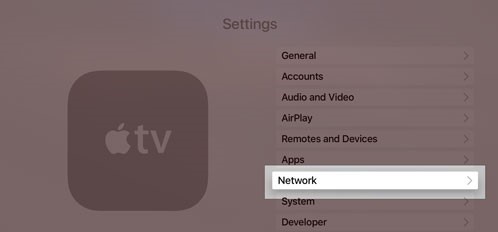
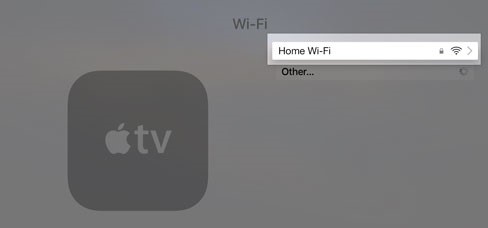
Step 2:
Select “Wi-Fi or Ethernet” (depending on how you are connected) and then select your connection to expand its settings.
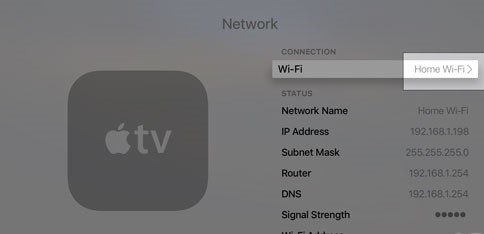
Step 3:
Select “Configure DNS” then “Manual” and enter 077.068.113.155 then “Done”.


Step 4:
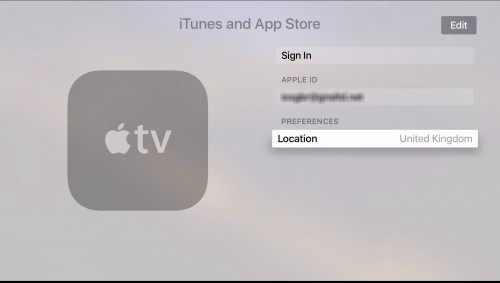
Now go back to settings and select “Accounts” then “iTunes and App Store”.
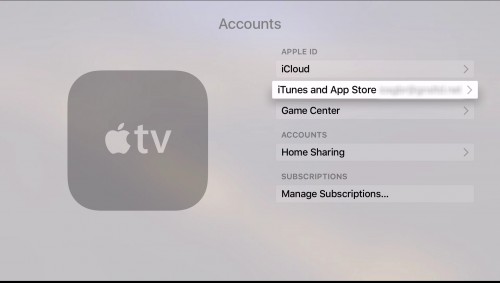
Step 5:
If you haven’t already signed in with a UK or AUS iTunes account then do so now. Now make sure location is set to United Kingdom or Australia accordinly.
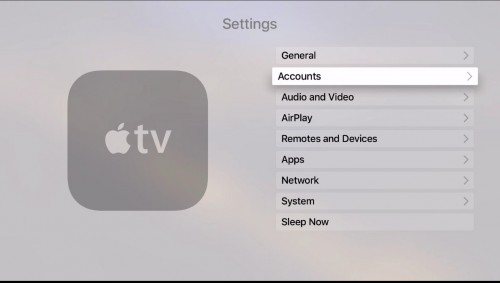
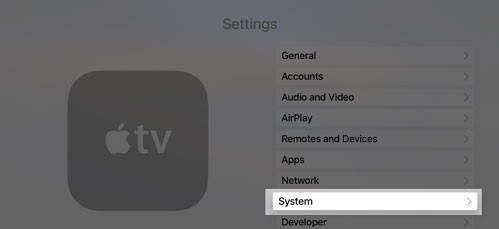
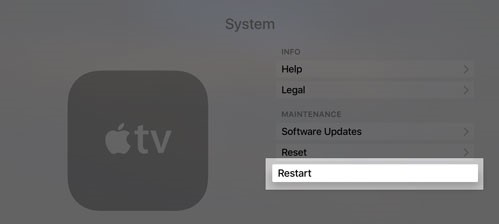
Step 6:
Now select “Settings” and “System” and restart the device. Once you restarted you can go to the app store and download and install the UK TV sites such as BBC iPlayer (UK) and iView (AUS).
That’s it, you’re done. You can now watch all your TV apps abroad. As explained above, make sure your network is registered using a PC, Mac or iOS device, this will register this device also. Note that although our service doesn’t buffer, there can be local connectivity issues that can cause buffering. In this case please power off and on your router and it should resolve.
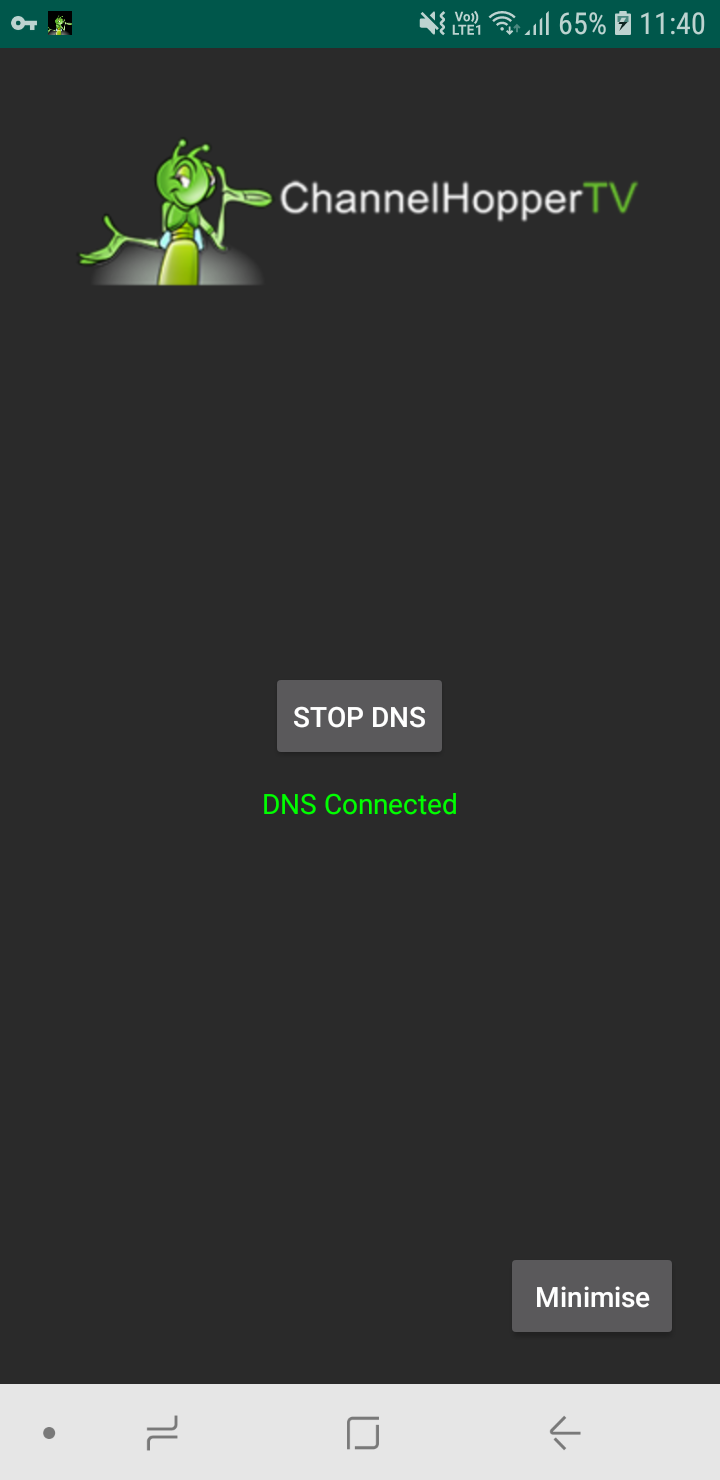
7. Using your Android phone, tablet or box.
Important: To watch on an Android device you will need to install the official TV apps e.g. BBC iPlayer (UK), iView (AUS) from your Google Play store account or directly from here: https://channelhopper.tv/apks/
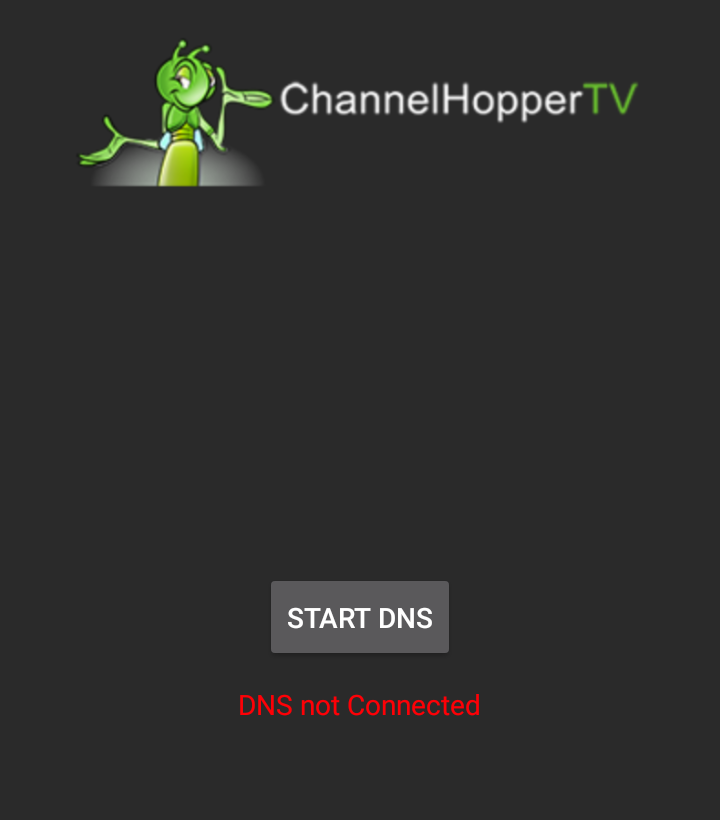
Step 1:
Install the ChannelHopper DNS Changer app from HERE.
Run the App and click “Start DNS”.

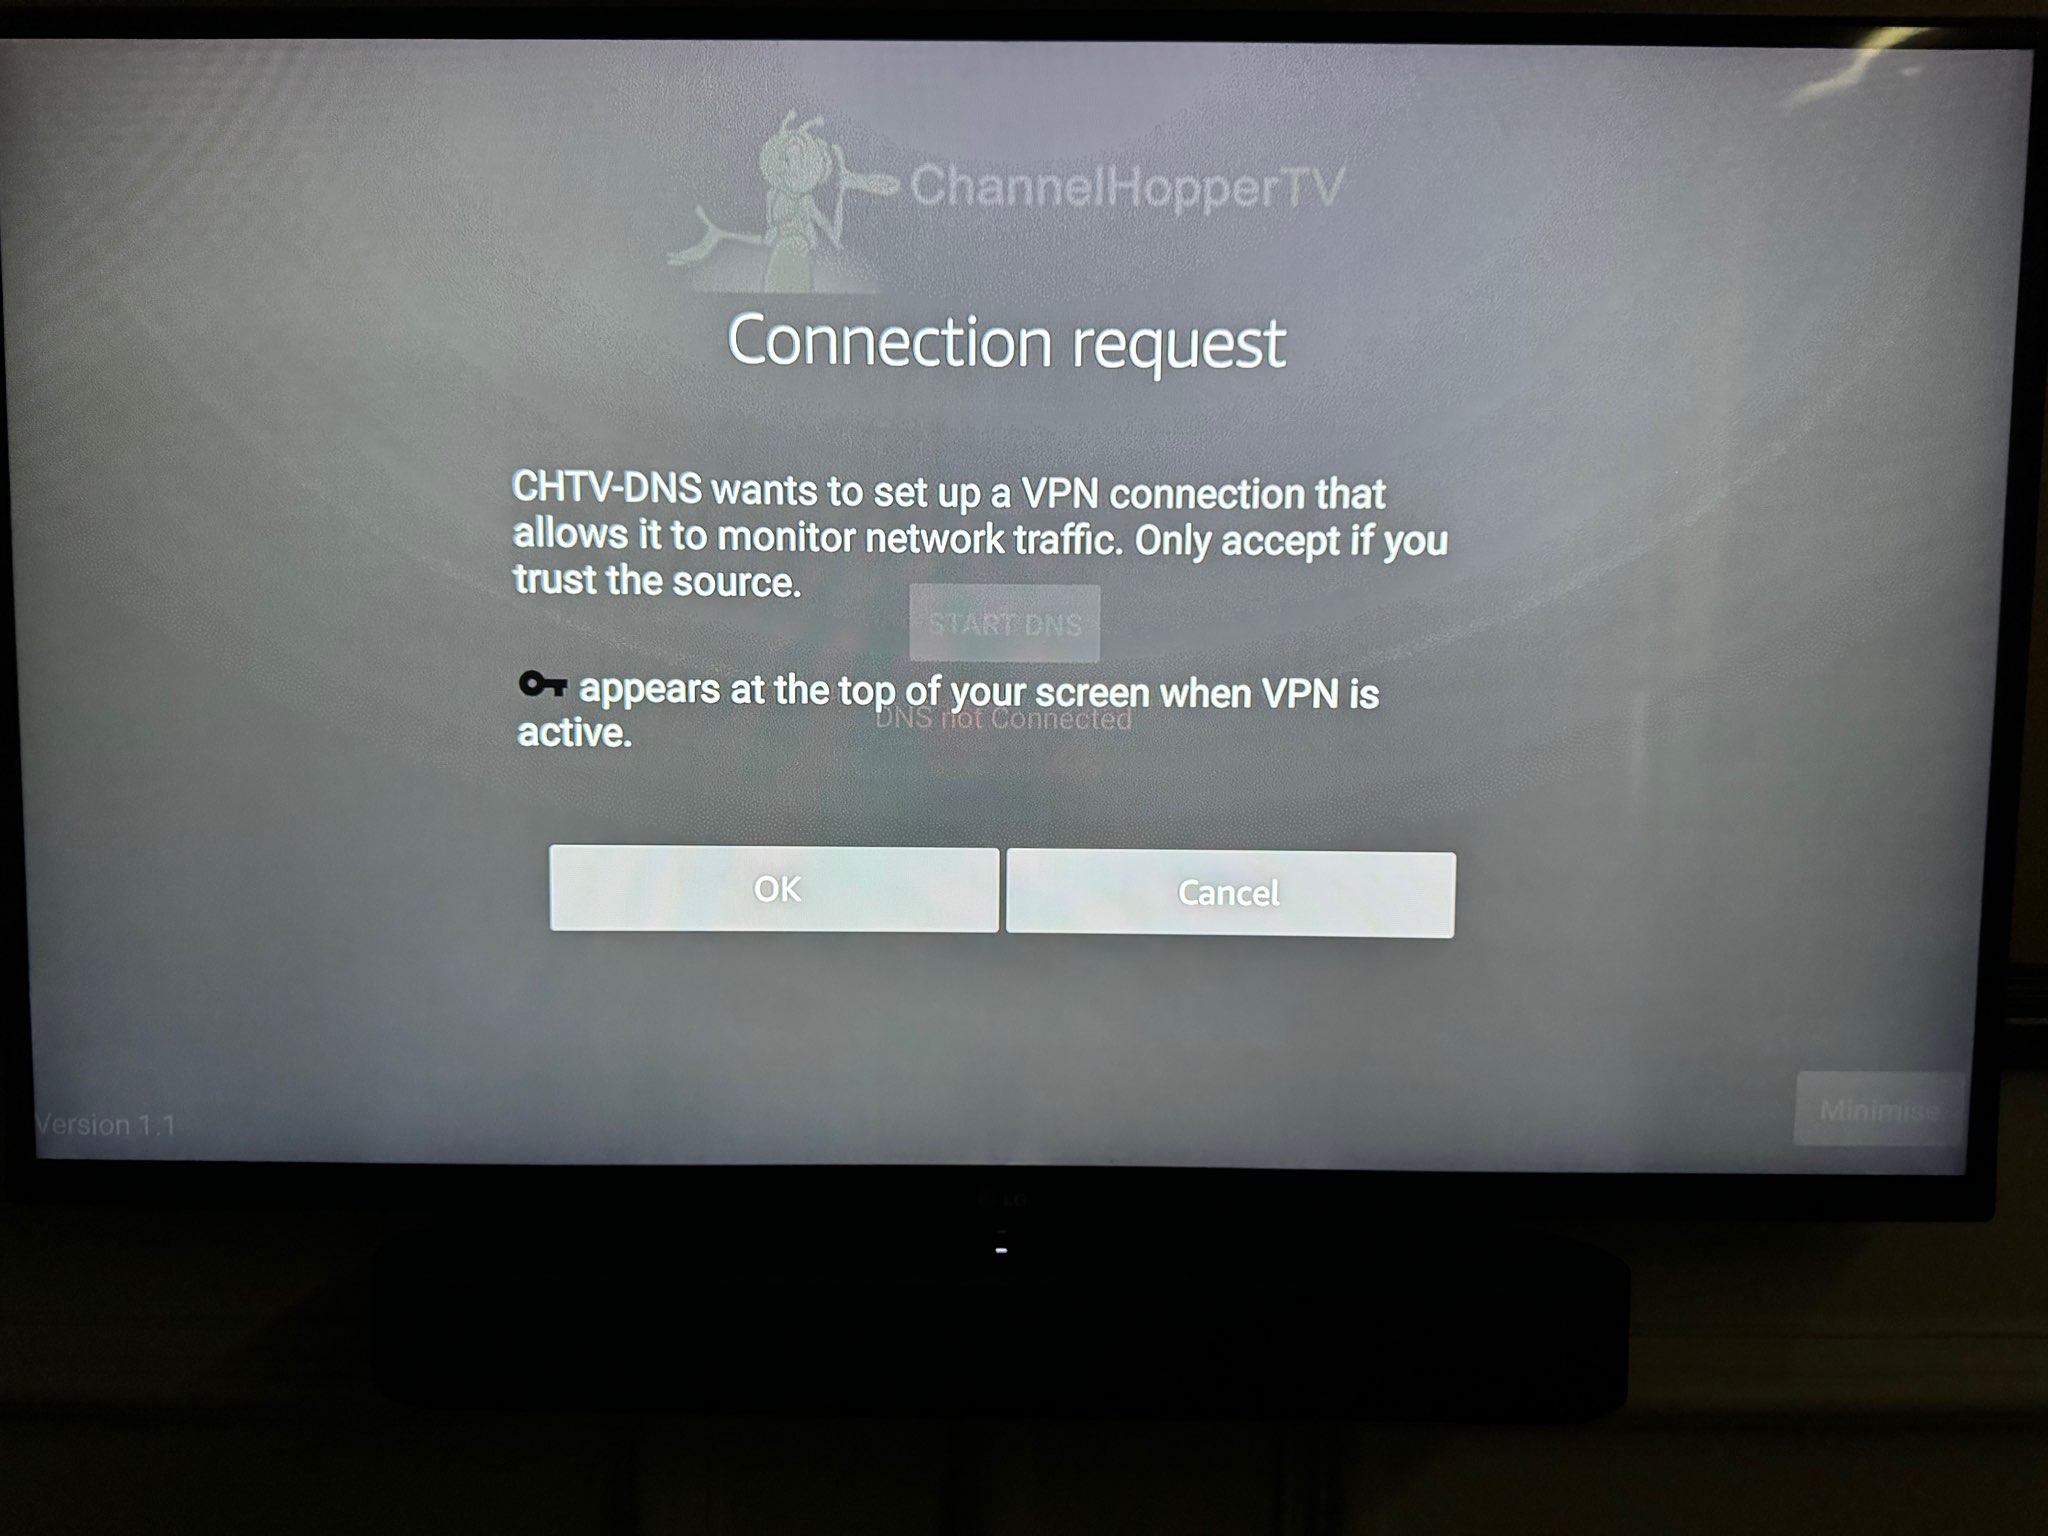
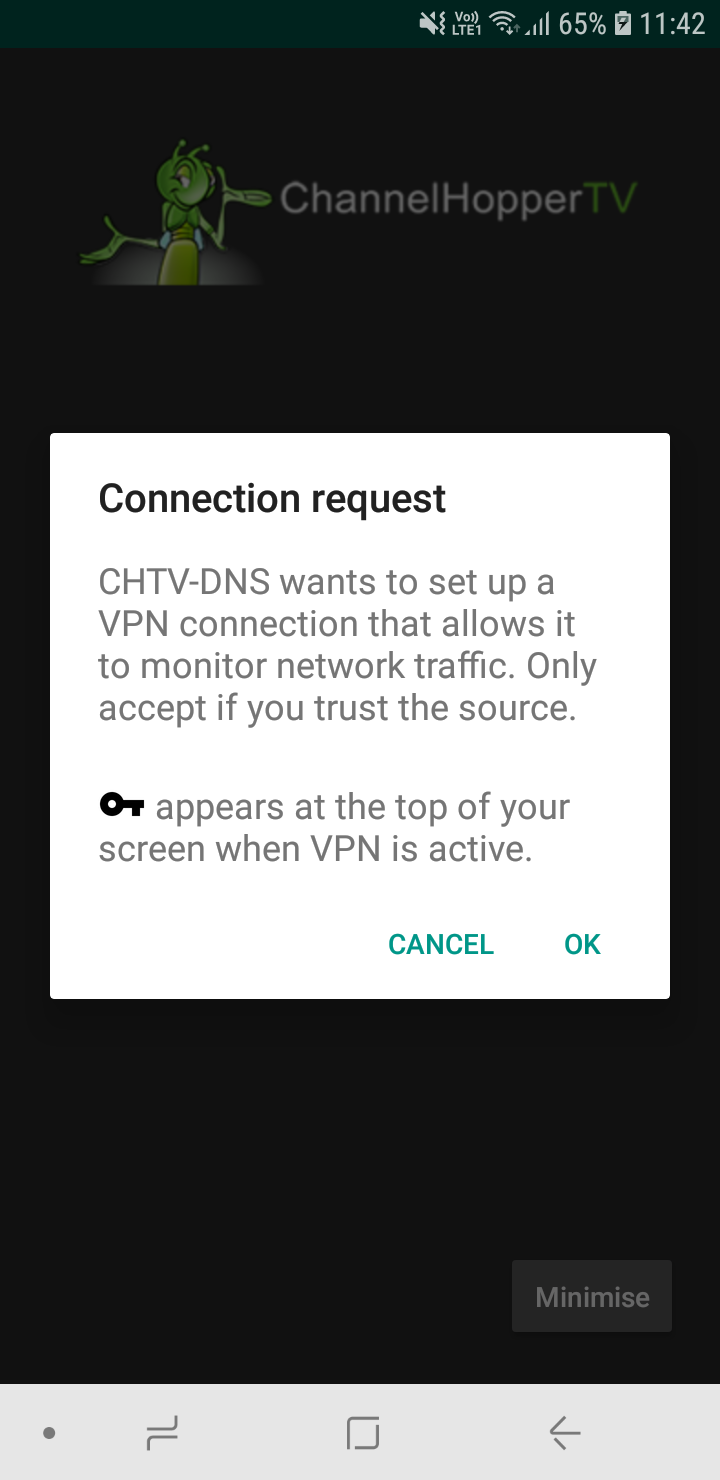
Step 2:
Click “OK”.
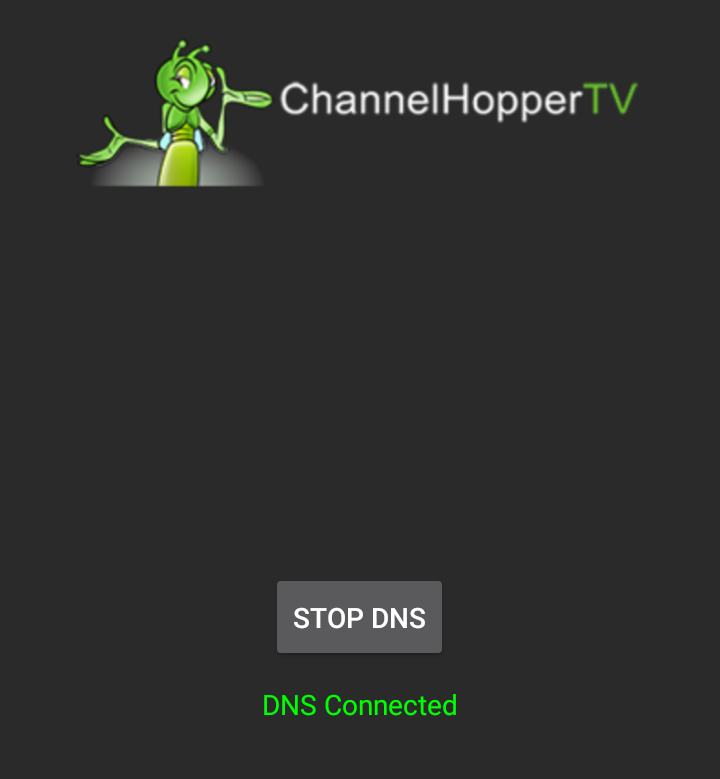
Step 3:
The App should now show you as Connected.Click “Minimise”
Step 4:
Open your browser and go to https://channelhopper.tv/login. Enter your credentials provided in your welcome email.
Step 5:
Click on “Register network”. This will register your home network for ALL devices. Now any device connected to this network with the DNS 77.68.113.155 configured will work with our service.
Step 6:
Now your network is registered, you can watch TV on all the various UK or AUS TV apps. If you don’t have them installed you can get them from here: https://channelhopper.tv/apks. Note that the official TV sites require you to register and login with them separately, this is nothing to do with your Channelhopper login so use your own email and password of choice to do so. Note that although our service doesn’t buffer, there can be local connectivity issues that can cause buffering. In this case please power off and on your router and it should resolve.
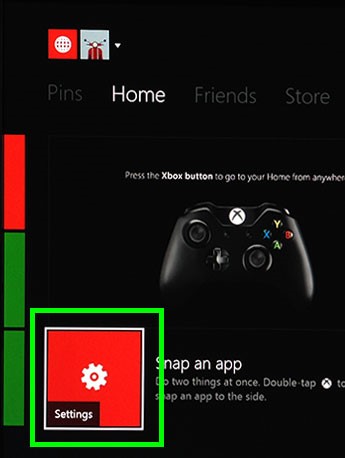
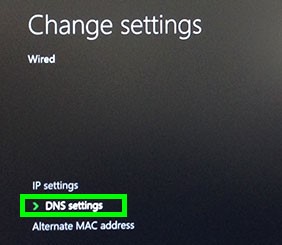
8. Using your Xbox
Important: Before following the steps below please register your network on a PC, Mac or iOS device on the same home network, this will also register your Xbox. To do this follow the relevant guide on this page.
You will also need to add all the TV apps of your choice to your Xbox. To do this, login to your Xbox and go to the apps store and add the required TV apps such as BBC iPlayer (UK) and iView (AUS). Note that these instructions are for the Xbox One. The Xbox 360 also works the same way.
Step 1:
Go to the main menu by pressing the Xbox button on the controller. Select Settings.
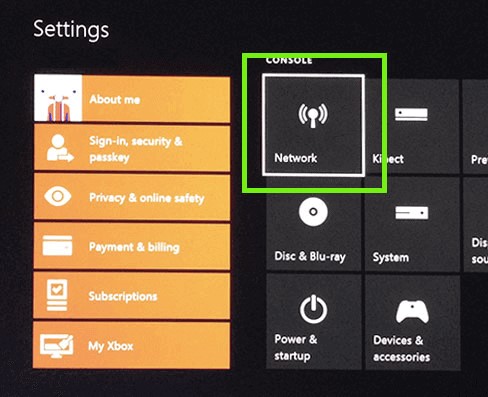
Step 2:
Select Network.
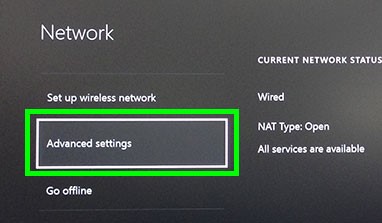
Step 3:
Select Advanced Settings.
Step 4:
Select DNS Settings.
Step 5:
Select Manual.
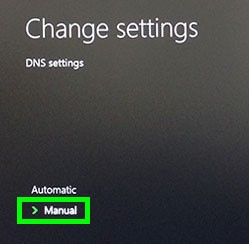
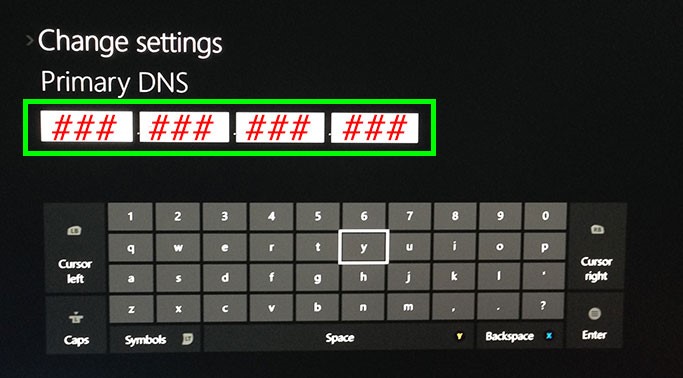
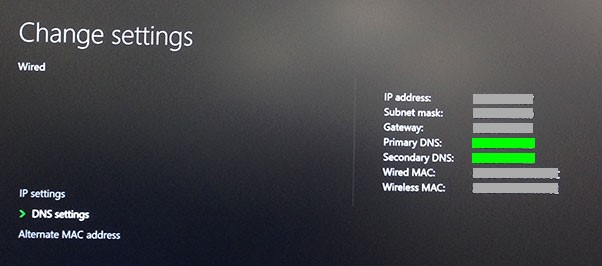
Step 6:
For the Primary DNS, enter the DNS: 77.68.113.155
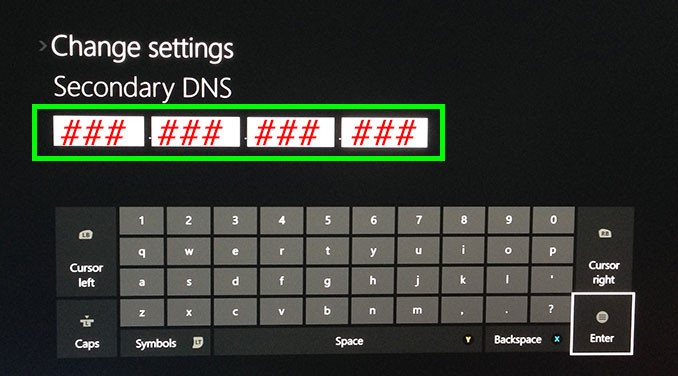
Step 7:
For the Secondary DNS, enter the same DNS: 77.68.113.155
Step 8:
When you are done, you will see a screen confirming your network settings. Press the (B) button to save your settings.
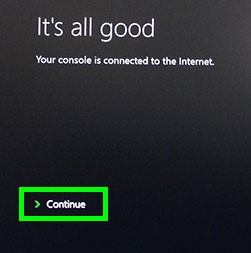
Step 9:
You will see a screen saying, “It’s all good”. Click Continue to start using.
Step 10 (UK Only):
Finally you need to change your location to the UK. To do so from the same Settings menu on the home dashboard select System > Language & Location then select English / United Kingdom.
Step 11:
That’s it, you’re done. You can now watch all your UK TV apps abroad. As explained above, make sure your network is registered using a PC, Mac or iOS device, this will register this device also. Note that although our service doesn’t buffer, there can be local connectivity issues that can cause buffering. In this case please power off and on your router and it should resolve.
9. Using your PS4
Important: Before following the steps below please register your network on a PC, Mac or iOS device on the same home network, this will also register your PS4. To do this follow the relevant guide on this page.
You will also need to add all the TV apps of your choice to your PS4. To do this, login to your PS4 and go to the apps store and add the required TV apps such as BBC iPlayer (UK) and iView (AUS) etc.
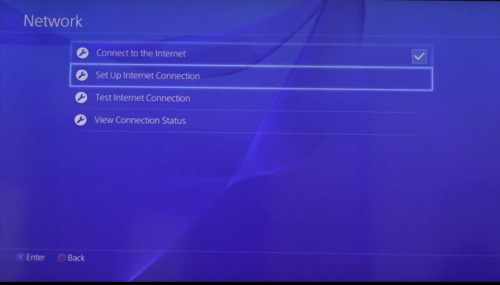
Step 1:
On your PS4, go to Settings then Network

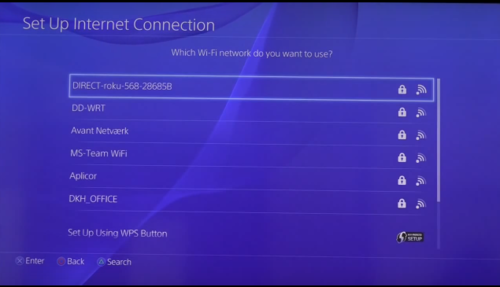
and select Set up internet connection
Step 2:
Choose your internet connection Wi-Fi or LAN depending on how your PS4 is connected to the internet.
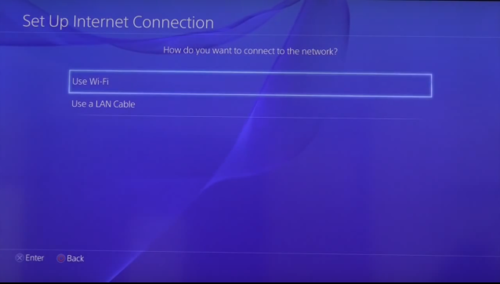
Then choose Custom

Step 3:
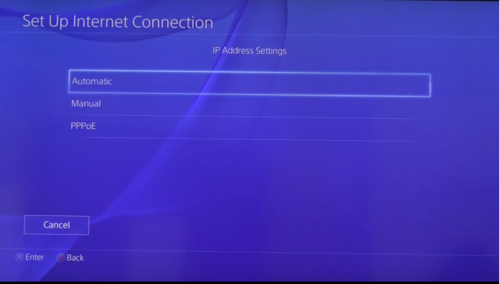
If using Wi-Fi, select your connection (different to what is shown) or LAN if connected by ethernet cable
then select Automatic for IP Address
Step 4:
Select Do Not Specify for DHCP Host Name
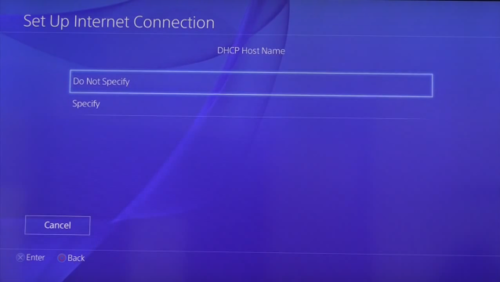
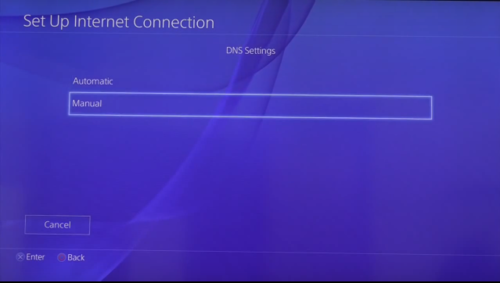
then Manual for DNS Settings
Step 5:
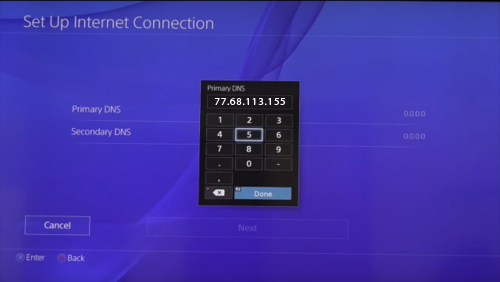
Set Primary DNS to 77.68.113.155 and click Done. (You can skip secondary DNS).
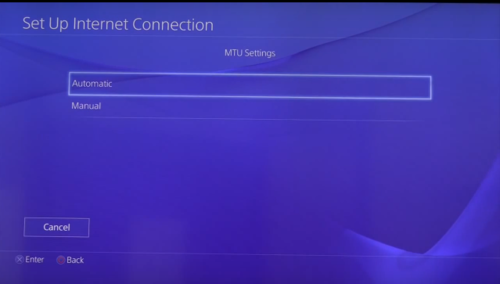
Set MTU settings to Automatic
Step 6:
Select Do Not Use for Proxy Server

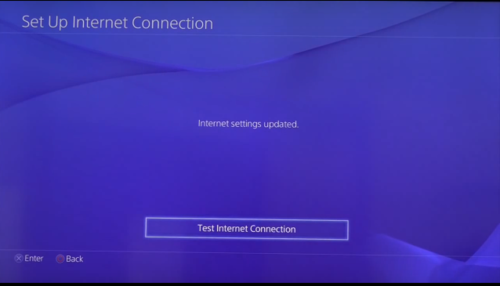
Select Test Internet Connection to test the internet then Restart your PS4.
That’s it, you’re done. You can now watch all your UK TV apps abroad. As explained above, make sure your network is registered using a PC, Mac or iOS device, this will register this device also. Note that although our service doesn’t buffer, there can be local connectivity issues that can cause buffering. In this case please power off and on your router and it should resolve.
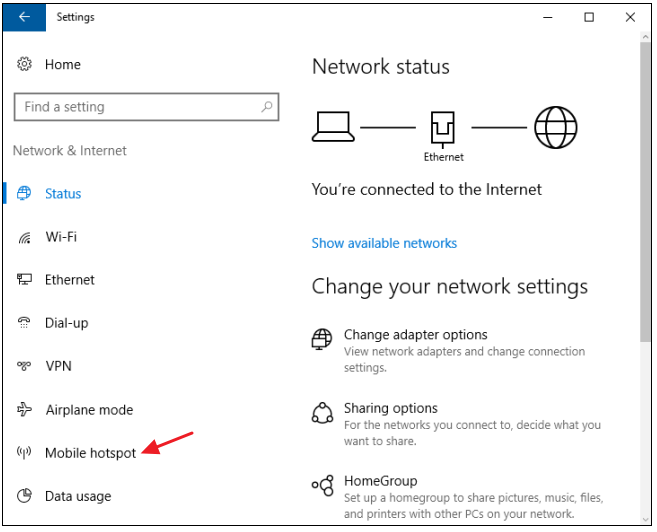
10. Windows Hot-Spot Method (Windows 10)
Once your Windows 10 PC has the Synchroniser app installed (see here for instructions) and is configured and running our service you can turn on the Mobile hot-spot and connect wireless devices to it without having to change any settings on the wireless devices. This is very useful for convenience in using Fire TV Sticks, Apple TV, Android and iOS devices. Also Roku sticks will work this way too.
Step 1:
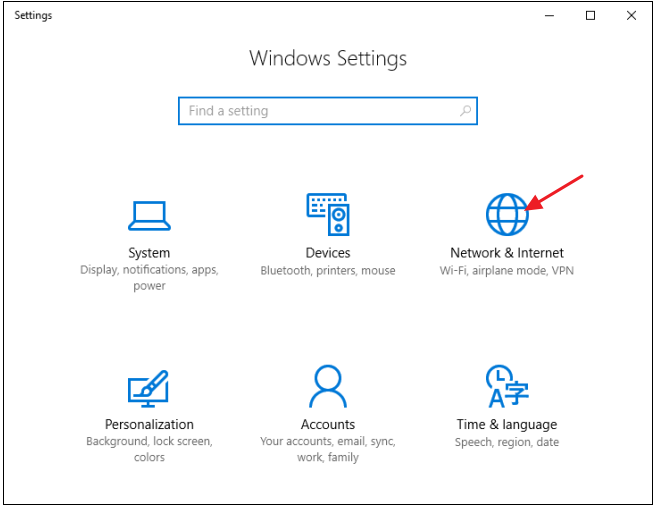
Open Settings by pressing Windows+I on your keyboard. On the main Settings page, click “Network & Internet.”
Step 2:
On the Network & Internet page, on the left-hand side, click “Mobile hotspot.”
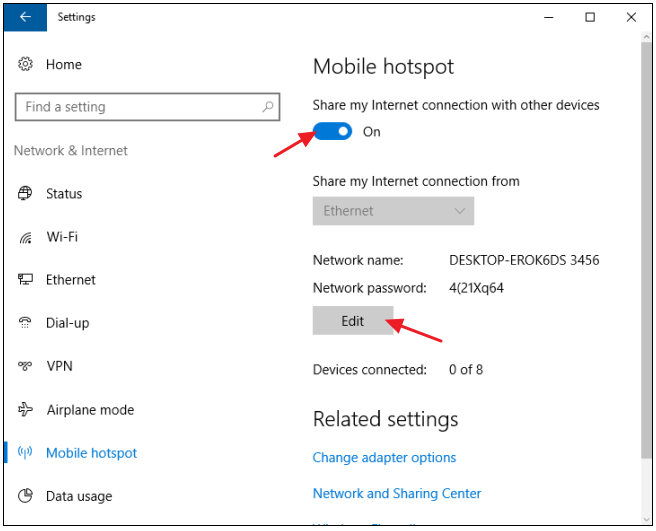
Step 3:
On the right-hand side, turn on the “Share my Internet connection with other devices” switch. If you want something other than the default network name and password, click the “Edit” button.
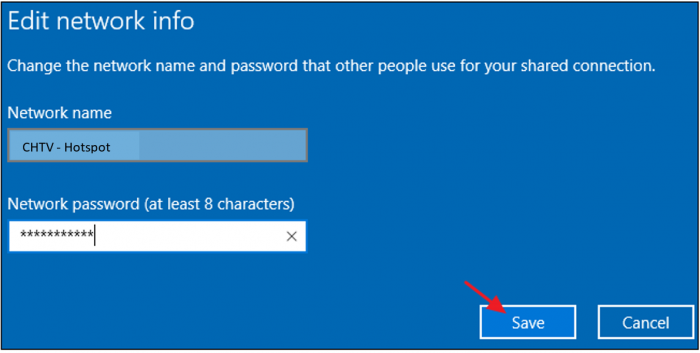
Step 4:
In the Edit window, type whatever network name and password you want to use and then click “Save”
Now you can connect wireless devices to the hot-spot and they will work with our service. Make sure the PC is near the device for a strong connection.
11. Using other devices
Smart TVs will work with our service but only if they have the BBC iPlayer (UK) or iView (AUS) etc. pre-installed.
If so refer to your TV instructions to manually edit the network setting and add our DNS 77.68.113.155 into the TV. Make sure your network is registered by setting up a PC, Mac or iOS device and then registering it here: https://channelhopper.tv/login . You should now be able to watch the UK TV sites via the apps on the Smart TV. Contact us if you need assistance. Note that Chromecast and Roku devices are NOT supported.
12. Renewing your ChannelHopper subscription
You will be emailed a renewal reminder email 48 hours before your subscription is due to expire. However, you can renew at any time by going to our pricing page HERE. This will avoid disconnection and any remaining days will be added to your new subscription.
13. Removing ChannelHopper
To remove the DNS from any of your devices please follow the exact same instructions as above but simply delete the DNS from your devices and your default DNS will automatically return in its place. To restore PC or Mac settings if you haven’t already installed the Synchroniser app then do so and then click “Remove CHTV Settings”. You can then uninstall the app if you wish. Apps available here: PC Network Synchroniser. Mac Network Synchroniser.
Instructions to manually remove the CHTV settings from your Mac are here.